Fifteen minutes of reading that makes everything else obvious. What your machines each do, what the confusing words mean, and what each tool in the app actually produces — in products and in dollars.
1Your machines & the map
You own (or will own) two machines that make completely different things, plus an app with ten rooms. Here is the whole system on one page.
The two machines
xTool O1 Omni
Bambu A1 (3D printer)
Think of it as
A super-printer that prints INK onto objects
A tiny robot that builds objects out of melted plastic
The things themselves: keychains, night lights, figurines, plaques, wall art
It eats
PNG image files (made in Design Studio)
STL 3D-model files (made in 3D Forge, or downloaded via Finder)
Its own software
xTool Studio (on your computer)
Bambu Studio (on your computer)
The most important sentence in this book: PrintForge makes the files; each machine's own software does the printing. No app anywhere on the internet can press "go" on your printers — they only listen to their own programs on your home network. PrintForge's job is making files so good the machine software has nothing to do but print them.
The ten rooms — which machine each one feeds
Room
Feeds
In one sentence
Dashboard
NO MACHINE
Scoreboard — is the business winning?
Design Studio
XTOOL
Make the flat art that gets printed ON things.
3D Forge
3D PRINTER
Turn photos into 3D objects the printer can build.
Model Vault (new)
3D PRINTER
Every model you've downloaded, rendered and weighed, with its "can I sell this?" answer attached.
Mockup Lab
NO MACHINE
Fake product photos of your designs — for Etsy and Instagram, before anything is printed.
Business HQ
NO MACHINE
Prices, orders, inventory, licenses, market days — the money.
Content Studio
NO MACHINE
What to film and post, and the kid-safety rules.
Finder
3D PRINTERXTOOL
Search the world's model & graphics libraries; track what you're allowed to sell.
Asset Library
NO MACHINE
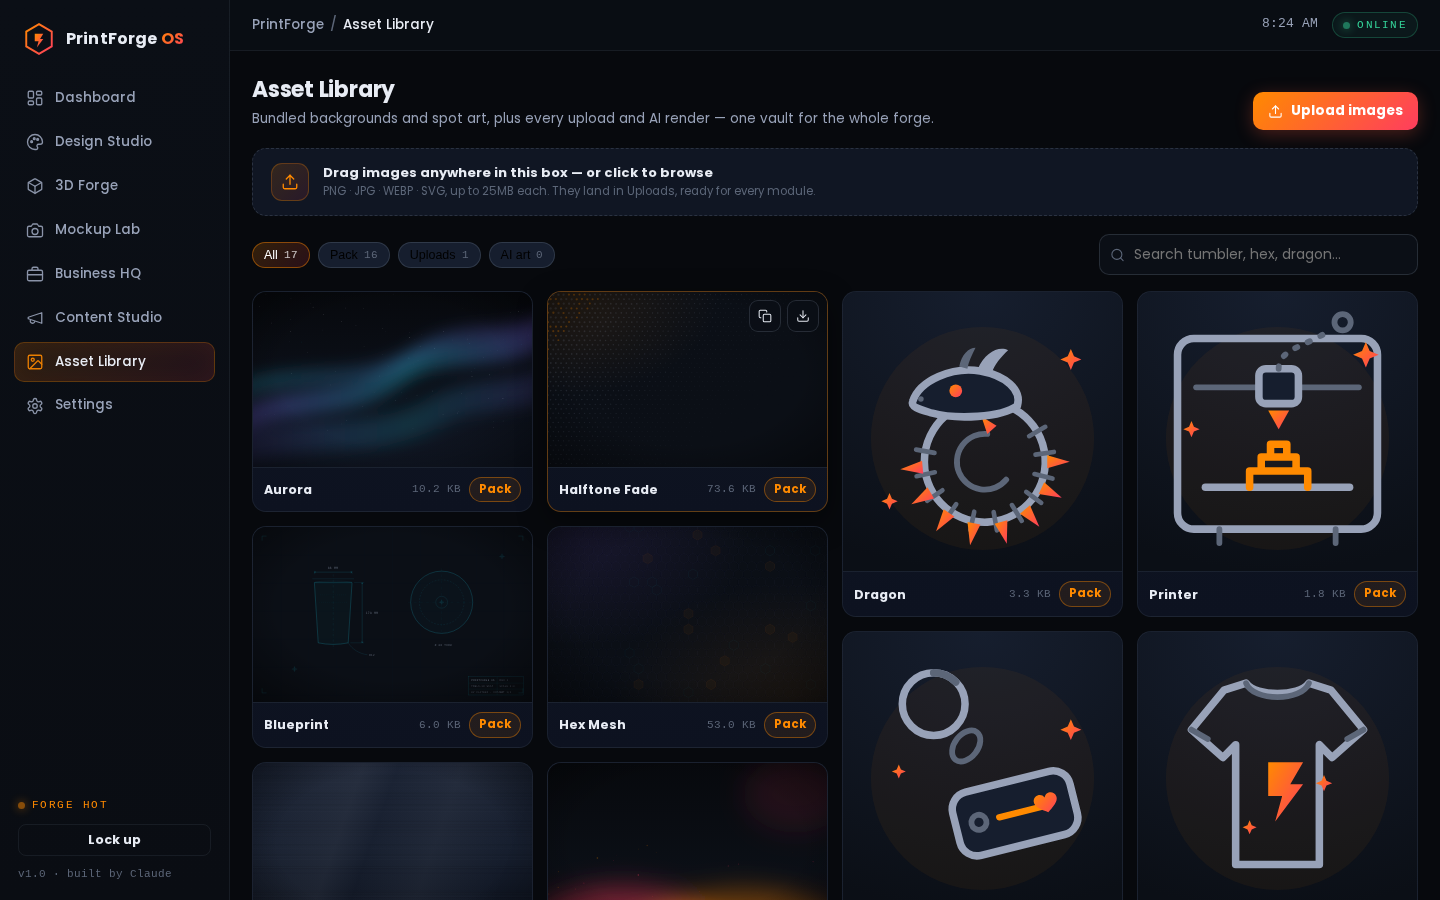
Every image you've uploaded or generated, in one drawer.
Settings
NO MACHINE
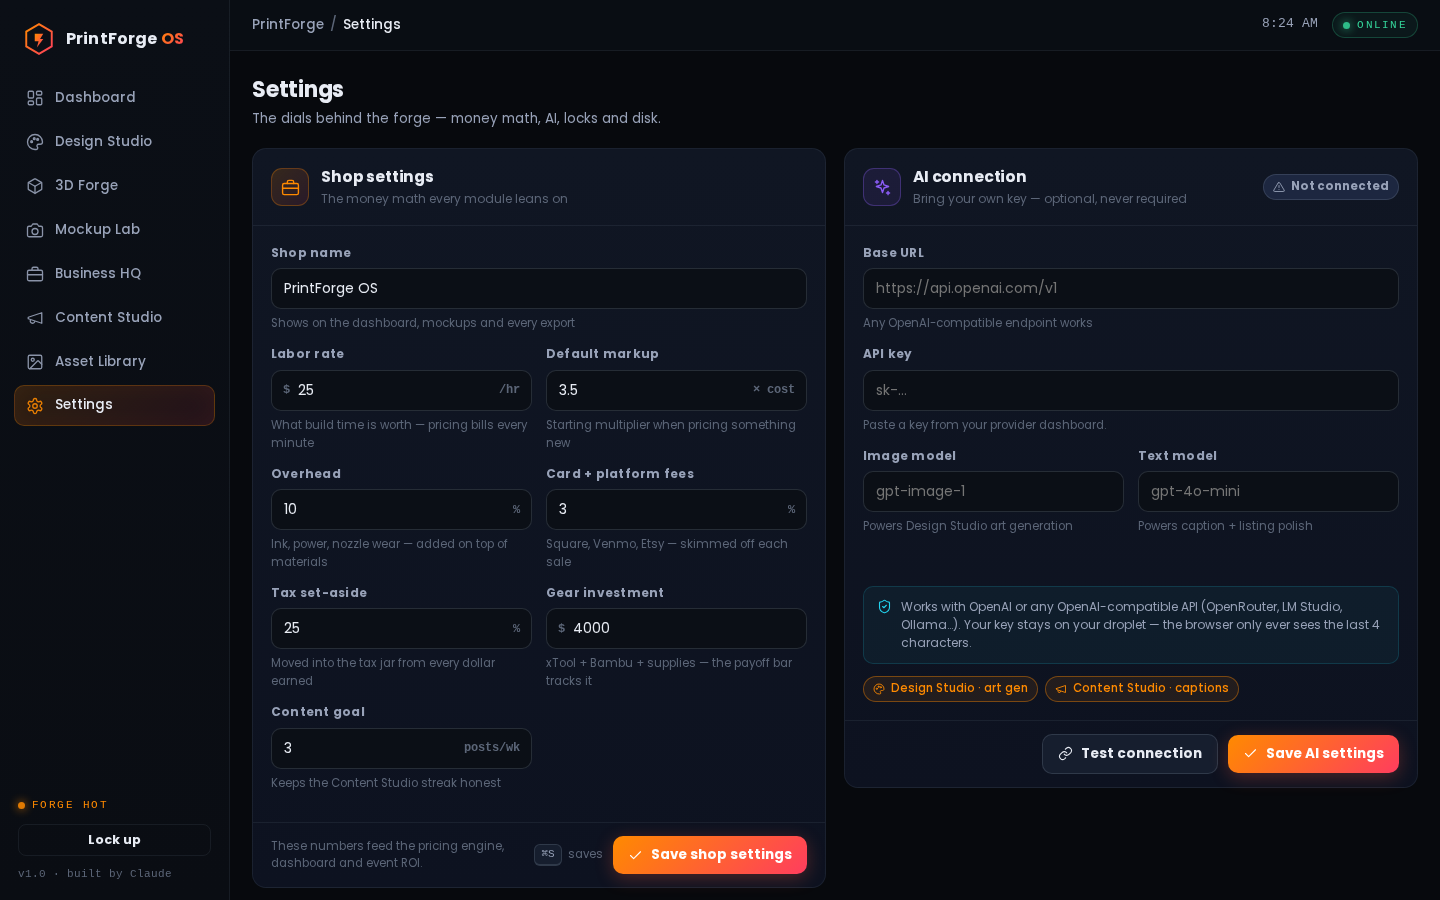
The numbers and keys every other room reads from.
"I want to make ___ — which room do I open?"
You want
Path
A tumbler / coaster / shirt design
Design Studio (start from a Layout!) → export PNG → xTool Studio
A night light from a photo
3D Forge → Lithophane → export STL → Bambu Studio
A name keychain
3D Forge → Keychain → Text mode → STL → Bambu Studio
A dragon/toy someone else designed
Finder → MakerWorld → download their STL → Bambu Studio (check the license!)
Keep track of everything you've downloaded
Model Vault — drop the zips in, it renders and files every model
An Etsy photo of a tumbler you haven't printed yet
Design Studio (save it) → Mockup Lab → export photo
A price for something new
Business HQ → Pricing Lab
Today's TikTok idea
Content Studio → Generator
Opening the door & finding your way — the basics nobody should have to guess
Logging in for the first time — the password screen and the default password. The first time you open your forge's address, you won't see rooms — you'll see a locked front door asking for a password. Every brand-new shop starts with the same one: printforge. Type it, click Enter the forge, and you're in. Then make Settings your very first stop and change it to something only you know — this single password is the only lock on your whole shop, customer names and all.
The password screen comes back about once a month — even mid-work. Every 30 days or so the app quietly locks its own door and asks for your password again — even if you use it daily, and occasionally right in the middle of something. Nothing is broken and nothing saved is lost; it's just the shop re-locking on a schedule. Type your password and carry on. Your phone and your computer each keep their own key, so each asks about once a month. One habit worth keeping: save as you go, because anything half-typed when the lock kicks in doesn't survive the trip back.
The "Lock up" button (signing out). At the bottom of the left sidebar sits a Lock up button — that's how you sign out. Click it and the app returns to the password screen until someone types the password again. Use it any time you've checked orders on a computer that isn't yours (the library, a friend's laptop, a booth neighbor's iPad) so the next person can't stroll through your customer list. On your own machines, ignore it — staying signed in is the whole convenience.
Closing popup windows — the X, the Esc key, or clicking outside (and none of them save). Every popup window — a new order form, a settings box — closes three ways: the X in the corner, the Esc key, or simply clicking the dark area around it. Handy, with one catch: closing is not saving. Half-fill an order and click outside by accident, and what you typed is gone — so always finish with the popup's own save button. The comforting flip side: whenever you delete something, the app stops to ask "Are you sure?" first, so one slip of the mouse can't erase an order.
Moving between rooms: the sidebar, the breadcrumb, and bookmarkable room addresses. The tall strip down the left side is the hallway: click any room's name to walk in, and the top of the screen always shows where you're standing ("PrintForge / Business HQ"). Clicking the flame logo takes you home to the Dashboard from anywhere. One trick worth knowing: each room has its own web address (the bit after the # in the address bar), so your phone can keep a bookmark that opens straight onto the Orders board — perfect for taking a custom order at the booth without tapping through the whole app first.
The "ONLINE" pill and "FORGE HOT" dot are decorations. Two badges are pure decoration, and knowing that keeps them from misleading you: the green ONLINE pill by the clock and the FORGE HOT dot in the sidebar are always lit. They don't check anything — and ONLINE definitely does not mean your printers are connected (remember Chapter 1: no app talks to your printers). If the connection ever truly drops, you'll hear about it from a red "Network error" note, not from that pill.
2The dictionary
Every word that made you squint, in plain English. Dog-ear this page.
3D printing words
Filament
The spaghetti-on-a-spool plastic the 3D printer melts and draws with. ~$15–20 a spool.
PLA
The standard, easiest filament. Everything you sell starts as PLA.
STL file
The universal 3D-model file — the "shape" of an object. Every 3D printer brand accepts STL. 3D Forge exports these.
Slicer
The program that cuts a 3D model into hundreds of thin layers and writes the printer's instructions. Bambu's slicer is Bambu Studio; your friend's Prusa uses PrusaSlicer; Creality folks use Cura. All eat STL files.
Layer height
Thickness of each plastic layer (0.08–0.2mm). Thinner = smoother = slower.
Infill
How solid the inside of a print is (15% = mostly hollow honeycomb; 100% = solid). Lithophanes want solid.
Watertight
A 3D model with no holes in its surface — sliceable without errors. Everything 3D Forge exports is watertight.
AMS
Bambu's filament changer — lets one print use up to 4 colors automatically.
Lithophane
A photo carved as thin-and-thick plastic; invisible until backlit, then the photo appears. Sells as night lights.
Relief / Emboss
An image raised up out of a flat surface, like the face on a coin. Deboss = carved in instead.
Filament painting
A picture built from a few layers of different-colored filament — looks like wall art, not a "print."
xTool / flat-printing words
Blank
The unprinted thing you buy cheap and decorate: plain tumbler, bare coaster, blank shirt. You sell "blank + your art."
UV printing
Ink cured instantly by UV light — prints on hard stuff: metal, wood, acrylic, slate, glass.
DTF
"Direct to film" — prints a transfer that heat-presses onto fabric. How your shirts get made.
UV DTF
Peel-and-stick printed decals for cups and irregular objects. No heat needed.
300 DPI
Print-quality resolution (300 dots per inch). Design Studio exports at exactly this — never "zoom and hope."
PNG / JPEG / SVG
PNG = the print file (crisp, supports transparency). JPEG = small preview file. SVG = editable "vector" master where text stays text at any size.
Safe zone
The dashed line inside a template — keep words inside it so nothing gets cut off at the edges.
Rotary
The xTool attachment that spins a tumbler so the printer can print all the way around it.
Business words
Mockup
A realistic fake photo of a product that doesn't exist yet. How every Etsy pro sells before printing.
COGS / materials cost
What ONE item costs you to make (blank + ink/filament + packaging).
Margin
The % of the price that's profit. Under 50% = raise your price.
Commercial license
Permission to SELL prints of someone else's design. Downloading free ≠ allowed to sell — the License Vault tracks your proof.
Blanks supplier
Where you buy blanks in bulk (MakerFlo, Amazon, etc.). Cheaper by the dozen.
App words
Template
A blank canvas pre-sized for a real product (20oz wrap, pet tag…).
Layout (new)
A finished design you start FROM — swap the name, done. 62 built in.
Magic Draft (new)
Describe a design in words; AI generates the artwork and your words land as editable text.
Artboard
The white rectangle you design on = the exact printable area.
Layer
One object in your design (a text block, a photo, a star). Stacked like paper cutouts.
Export
Producing the final file for the printer (or Etsy). The design stays editable; the export is a copy.
3The products & the money
Every tool in this app exists to make one of these. Costs are your real numbers from the playbook; prices are what these actually sell for at markets.
Product
Made in
Machine
Costs you
Sells for
Custom 20oz tumbler
Design Studio
xTool
~$7.50
$25–35
Slate coaster set (4)
Design Studio
xTool
~$6
$20–30
Pet tag
Design Studio
xTool
~$4
$15–25
Team/league shirt
Design Studio
xTool (DTF)
~$8
$20–28
Name keychain
3D Forge → Keychain
Bambu
~$0.80
$8–12
Photo night light
3D Forge → Lithophane
Bambu
~$5
$25–40
Logo plaque
3D Forge → Relief
Bambu
~$2
$15–30
Filament painting (wall art)
3D Forge → Filament Painting
Bambu
~$2
$20–45
Licensed dragon/flexi toy
Finder → MakerWorld etc.
Bambu
~$2.50 + license
$15–35
The pattern: personalization is the margin machine. A blank tumbler is a commodity; "your kid's name on it, ready in an hour" is a $28 product. Everything in this app — layouts, Magic Draft, the lithophane maker — is built to make personalizing FAST, because fast personalization is the whole business.
The one legal rule, one more time: things YOU design are 100% yours to sell. Things you download are not, unless their license says so (or you bought one). No Disney, no Pokémon, no Nintendo — ever, not even "fan art." Chapter 11's Finder bakes this rule into the workflow.
PART 2
The rooms
One chapter per room. Each opens with the same three-line box — what this room is, which machine it feeds, what you sell from it — then walks you through like a friend standing behind you, then lists every control for later look-ups.
4Dashboard
What this room is: the scoreboard. You never type here — it reads everything else and answers "how's business?"
Machine:NONE
What it earns you: nothing directly — it keeps you honest and pointed at what matters today.
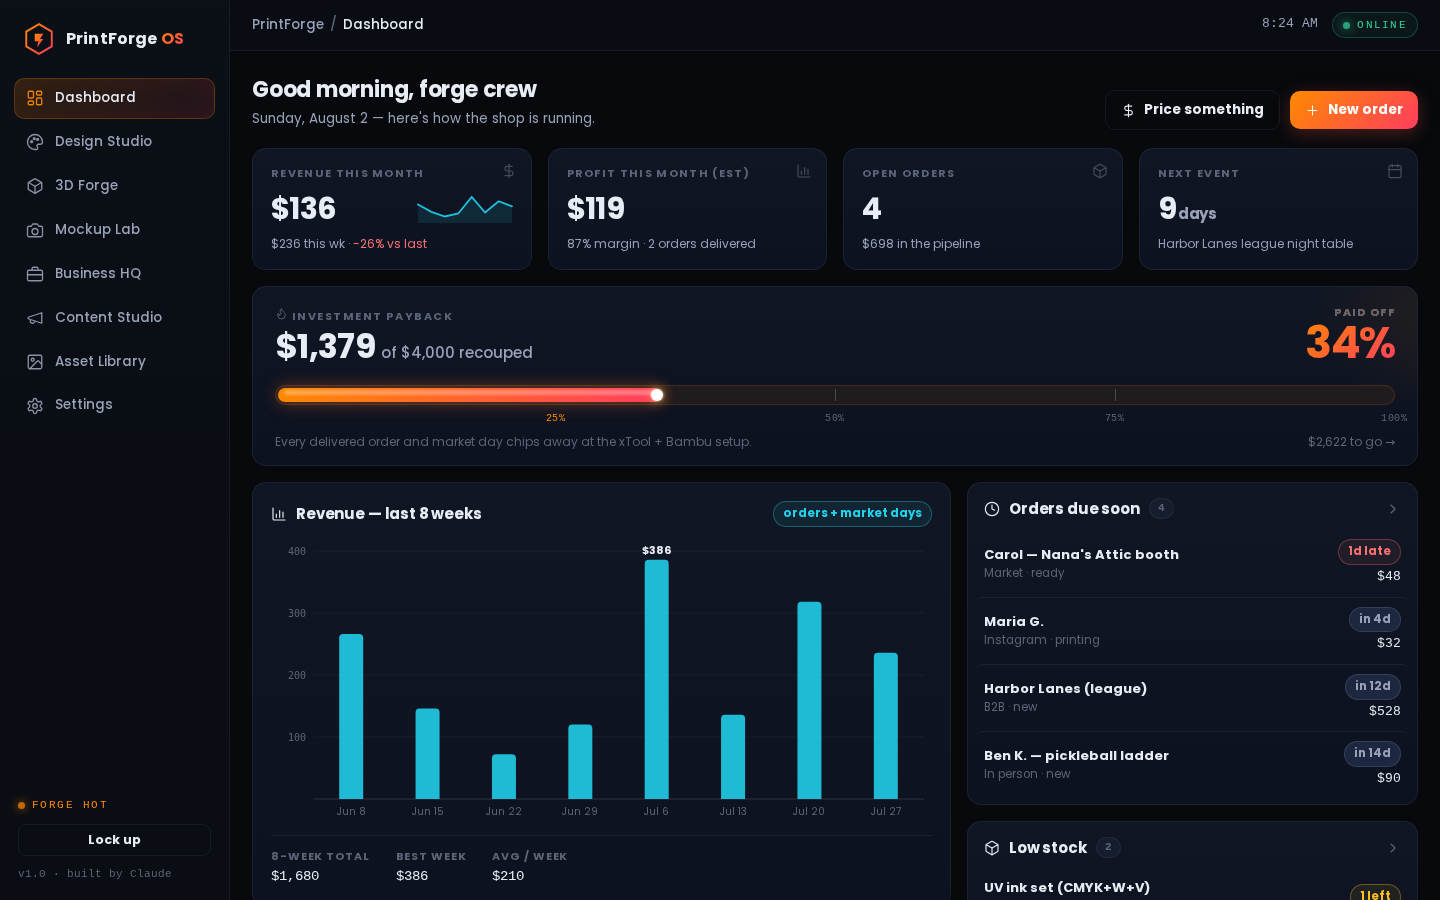
The Dashboard with sample numbers. Yours starts at $0 — every dollar that appears here is real. (Older installs shipped with practice orders under fake names like "Erica P." — if you see those, run the clean-slate reset from Chapter 16 once; v1.3.1 never invents them.)
The four tiles up top: money that came in this month, the profit inside that money, how many orders are still in progress (and their dollar value), and how many days until your next market. They count up with a little animation when the page loads — that's your daily two-second health check.
The big orange bar is the Investment Payback thermometer — the soul of the app. Every order counts the moment it's delivered (marking it paid early also counts it — the bar believes either signal), adding its profit toward the finish lineprofit to the bar, filling toward the number you set in Settings → Gear investment (your real all-in equipment spend). The ticks light at 25/50/75/100%. The day it fills, your machines have paid for themselves — film that moment.
Below: an 8-week revenue chart (each bar = one week of orders + market days), orders due soon (overdue turns red), low-stock warnings from your inventory, upcoming events, any license renewing within 14 days, and this week's content progress. Every card is a door — click its title and you're in the room that feeds it.
Daily habit (20 seconds): open the Dashboard. Anything red? Handle it first. Nothing red? Go make things.
The fine print — small things that eventually matter
The "New order" and "Price something" buttons in the Dashboard header. Top-right of the Dashboard live two shortcut buttons. When a customer messages you mid-coffee, hit New order and you're already on a blank order form in Business HQ — no hunting through rooms while they wait. Price something drops you straight into the Pricing Lab. The Dashboard itself is still read-only; these buttons just save you the walk.
The payback thermometer's finish line defaults to $4,000 until you set your Investment total. Until you enter your real all-in equipment spend in Settings → Investment total, the thermometer measures against a $4,000 placeholder. If the finish line shows a number you never typed, that's why — set your true figure first, or the "paid off" day the bar celebrates won't be your real one.
Each side card shows only its few most urgent items, not everything. The side cards are a highlights reel, not the whole story: Orders due soon shows at most 5, Low stock 6, Upcoming events 4, renewals 5. On a busy week with nine orders due, four of them won't be on the Dashboard — so before a big weekend, click through to the room itself for the full list. That's what the little arrow on every card title is for.
The amber badges — the warning tier between "fine" and red. The badges follow one traffic-light rule everywhere: red means something already slipped — a late order, a bin at zero, an overdue license. Amber means it's coming at you — an order due within 3 days, stock running low, an event or renewal inside the week. Handle red first, like the daily habit says; amber is what you print or reorder tonight so it never turns red.
The revenue chart is interactive: hover for exact weekly dollars, click to open Orders, plus three totals underneath. The bars talk back. Run your mouse across the chart and a little tag shows each week's exact dollars; your best week wears its number on top. Click the chart and you land in Orders. Underneath sit three honest numbers — 8-week total, Best week, and Avg / week. Watch the average: one great market day can flatter a whole month.
The small print on the two money tiles: sparkline, week-vs-last-week %, margin %, and the "(est)" tag. Look closer at the two money tiles. Revenue carries a tiny squiggle of your last 8 weeks and a green or red "vs last" percentage — your week-over-week pulse without opening the chart. Profit says "(est)" because it's your prices minus the costs you logged, so it's only as honest as the costs you type in; the margin % beside it tells you how much of each dollar you actually keep.
The "Could not load the dashboard" error screen. If the Dashboard ever greets you with "Could not load the dashboard" and a techy-looking line underneath, don't panic — your numbers aren't gone, the page just couldn't reach the server for a moment. Refresh first. If it keeps up, it's Chapter 16 time: "turn it off and on again" fixes 90% of weirdness, and you can paste that techy line to Claude.
5Design Studio
What this room is: where flat art gets made — a drawing program that already knows your blanks' exact sizes.
Machine:XTOOL — everything here exports as a PNG the O1 Omni prints onto stuff.
What you sell from here: tumblers, coasters, pet tags, shirts, hat patches, stickers, phone cases.
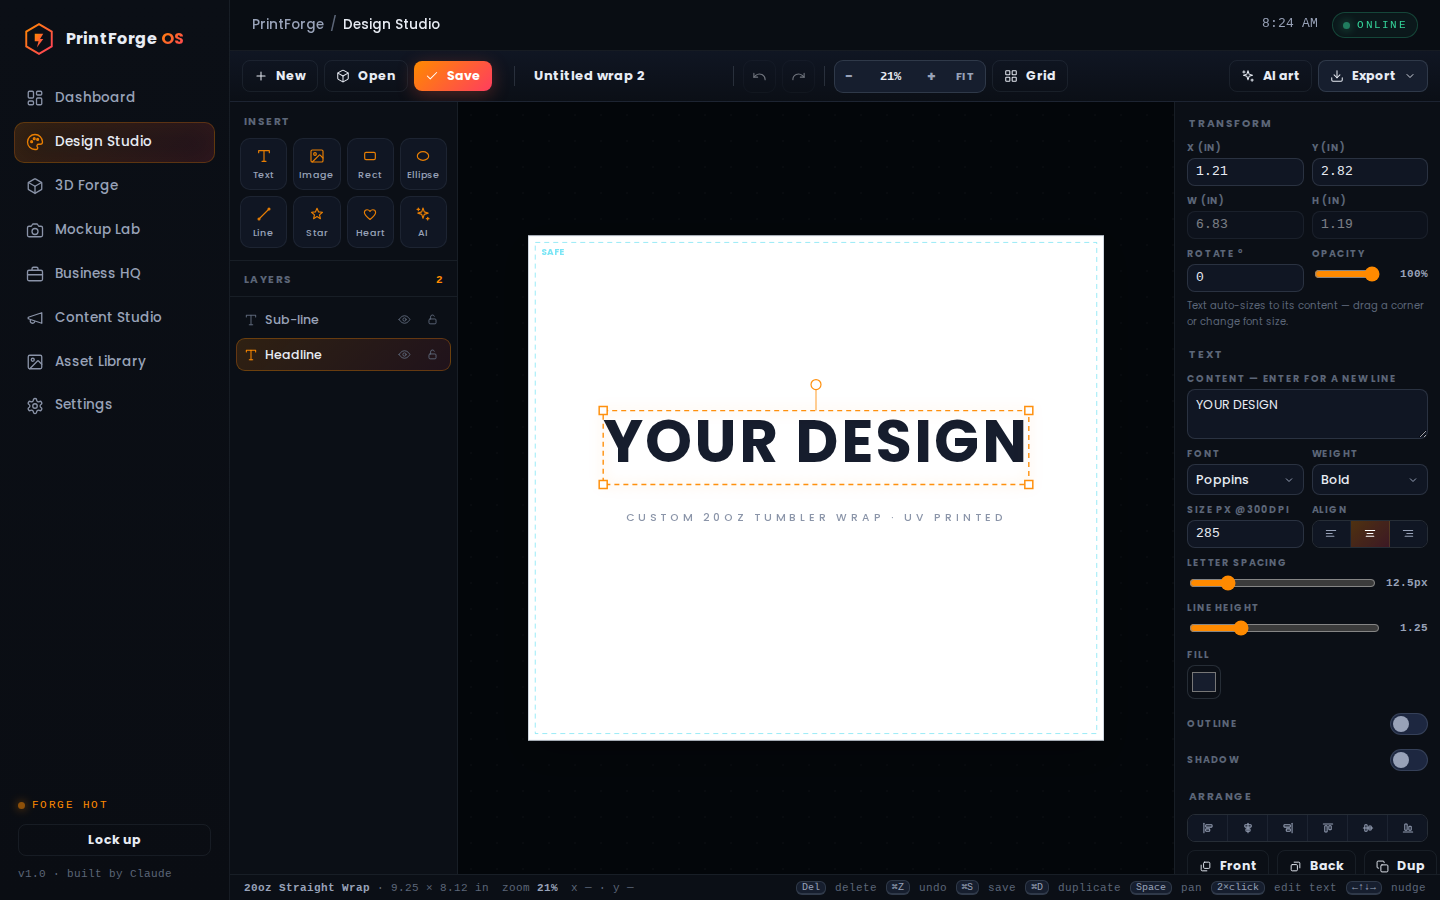
Tools and layers on the left, your artboard in the middle, properties of the selected thing on the right.
The idea in 30 seconds
You pick a template (a canvas pre-sized to a real product), place objects on it (text, photos, shapes — each one a "layer" you can move, resize, rotate), and export a print-perfect PNG. Since v1.1 you almost never start from nothing: you start from a Layout or a Magic Draft and personalize.
NEW — Layouts: start from a finished design
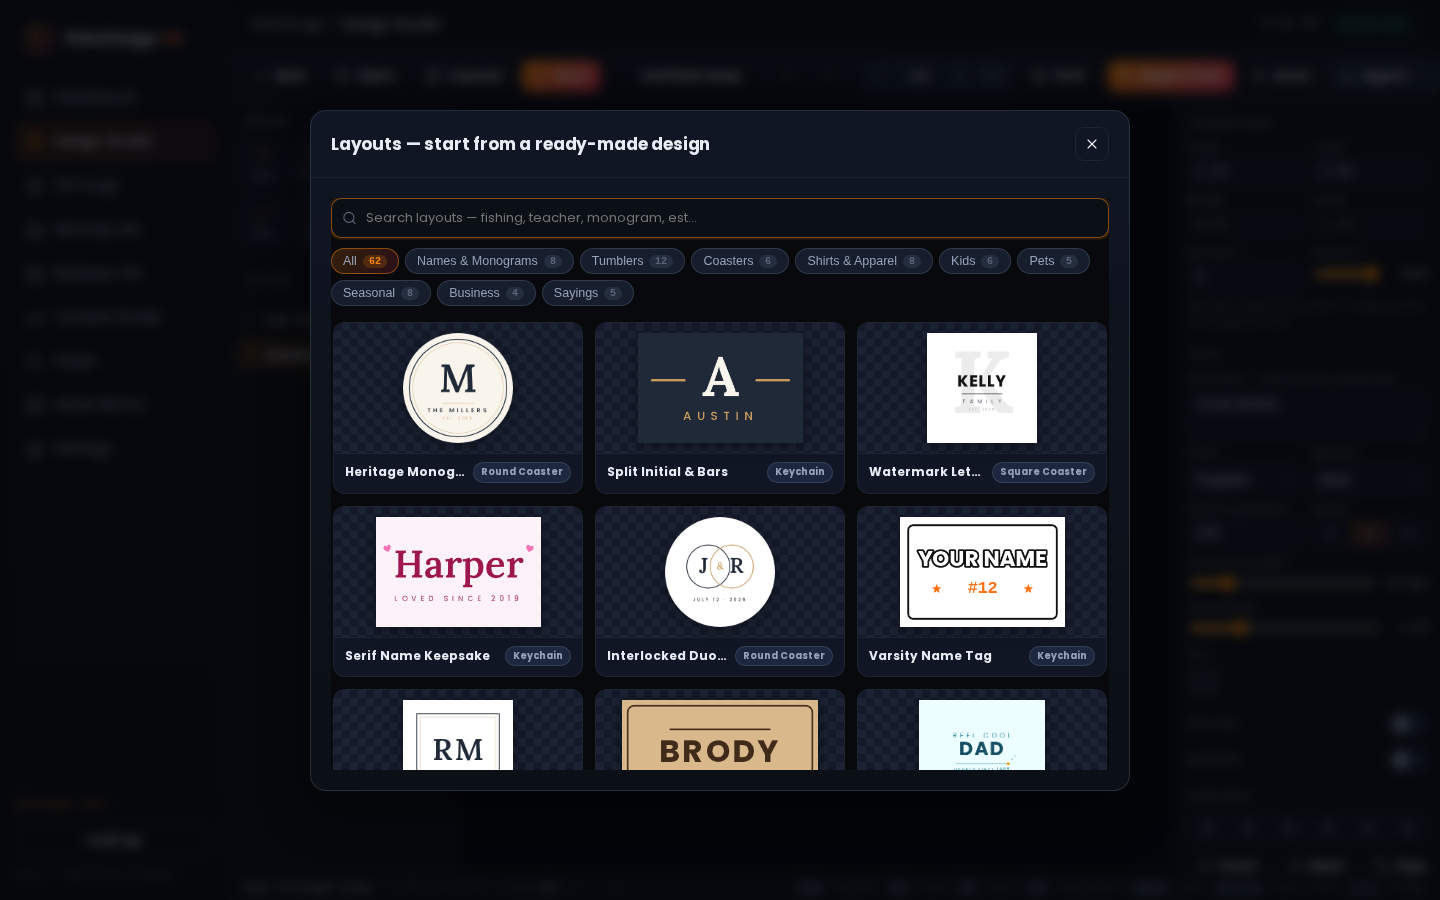
The Layouts browser: 62 ready designs, searchable, filterable, live-previewed.
Click Layouts in the toolbar (or + New → Layouts tab).
Search anything — "fishing," "teacher," "monogram," "Christmas" — or click a category chip.
Click a card. The whole design loads on the right template, ready to edit.
Double-click the placeholder text (YOUR NAME, EST. 2026…), type the customer's real info, done. Change colors in the right panel if you like.
Ctrl/Cmd+S saves it as a NEW design (layouts never overwrite your saved work), then Export.
Why this matters: a custom tumbler that took 20 minutes of design now takes 90 seconds. At a market, "what's her name?" → type it → "pick it up in an hour" is a $28 sale you couldn't take before.
NEW — Magic Draft: describe it, AI builds it
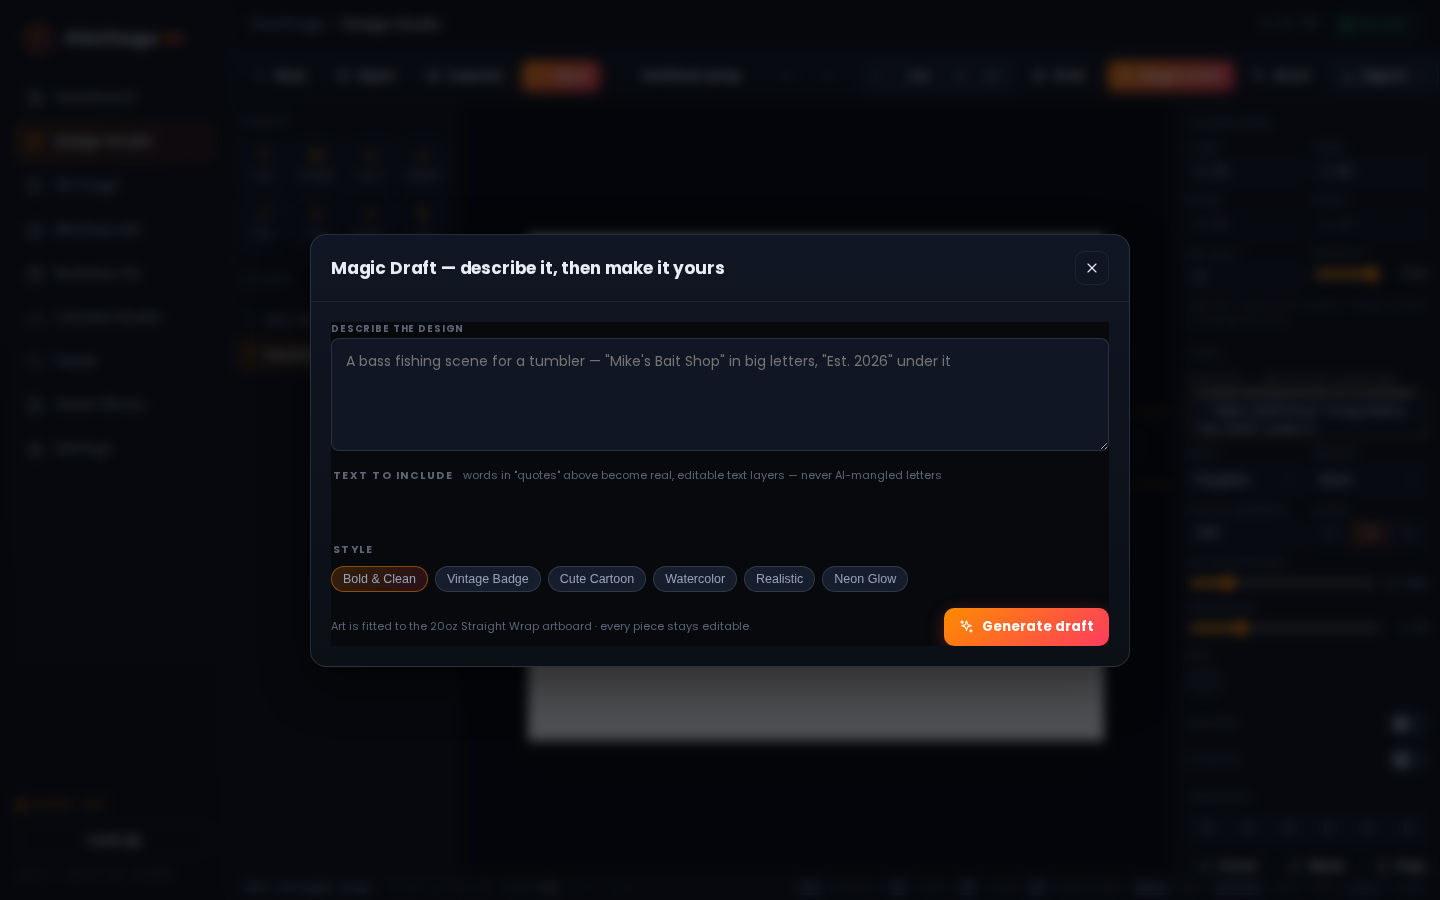
Magic Draft: your words in quotes become editable text; everything else becomes the artwork.
Click ✨ Magic Draft. (Needs the 5-minute AI hookup from Chapter 13 — until then it politely points you there.)
Describe the design, putting any words you want ON the product in "double quotes": A bass fishing scene for a tumbler — "Mike's Bait Shop" in big letters, "Est. 2026" under it. The quoted phrases appear as chips you can edit or add to.
Generate (10–30 seconds, a few cents). The artwork lands sized to your blank, and your quoted words land ON TOP as real, editable text layers — the AI is told to paint no letters, because AI-painted text is misspelled garbage you can't fix. Your text is yours.
Don't love it? Ctrl/Cmd+Z removes the whole draft; tweak the prompt and go again. Love it? Adjust, save, export.
The everyday moves (learn these seven)
Select = click it. Move = drag it (orange lines flash when centered — trust them).
Resize = drag a corner. Rotate = grab the knob above it.
Edit text = double-click it. Undo anything = Ctrl/Cmd+Z. Save = Ctrl/Cmd+S.
That's 90% of your life here. The full control reference — every template size, every panel, every shortcut — is in the tables below; skim once, return when you need a specific thing.
Reference: templates
Template
Real size
For
20oz Straight Wrap
9.25 × 8.12 in
Standard tumblers — your main seller
Skinny Tumbler Wrap
9.7 × 8.2 in
Skinny 20oz blanks
Coaster round / square
4 in ⌀ / 3.9 in
Slate & ceramic coasters
Keychain
3 × 2 in
UV-printed acrylic blanks
Pet Tag
1.25 in ⌀
Tags (make a front AND a back design)
Shirt Front / Left Chest
12 × 16 / 4 × 4 in
DTF apparel
Hat Patch
4 × 2.25 in
Trucker hats
Sticker Sheet
8.5 × 11 in
UV-DTF decal sheets
Phone Case
3.2 × 6.4 in
Full-back case prints
Custom…
0.5–24 in each way (Circle locks height = width)
Whatever blank you found
Reference: panels & controls
Left rail: insert buttons (Text · Image · Rect · Ellipse · Line · Star · Heart · AI) + the Layers panel — eye hides, lock freezes, drag or ▲▼ reorders (top of list = front of design), double-click renames.
Right rail: position/size in inches, rotation, opacity for anything; text gets font/weight/size/align/letter-spacing/line-height/fill/outline/shadow; images get replace/round-corners/flip; shapes get fill/outline (+ corner radius, star points, line dash). Arrange row: align to artboard 6 ways, front/back, duplicate, delete. Artboard panel: change template, background color or transparent, safe-guide toggle.
Status bar: template · physical size · zoom · cursor position in inches · shortcut hints.
Reference: exporting
Export
Use when
PNG — 300 DPI
The print file. White background, exact size. → xTool Studio.
PNG — transparent
Unprinted areas should stay bare (acrylic, stickers) — and for Mockup Lab.
JPEG
Quick previews to text a customer. Never for print.
SVG
Editable master copy — text stays real text.
Always SAVE, not just export. Saving stores the design forever AND creates the preview the Mockup Lab needs. Export-only work can't be mocked up or re-edited.
The fine print — small things that eventually matter
No autosave — leaving the Design Studio (or closing the tab) silently throws away unsaved work; the orange dot next to Save is the only warning. The Studio never saves on its own. See the little orange dot glowing next to the Save button? It means the design on your screen has changes that exist nowhere else yet. If you click New, Open, or a Layout, the Studio will warn you first — but if you wander to another room to check an order, or close the browser tab, it won't say a word, and the design is gone when you come back. Press Ctrl/Cmd+S every few minutes, the same way you'd never walk away from the printer mid-job.
The Open button — how to get a saved design back (and delete old ones). Every design you Save waits behind the Open button in the toolbar — a wall of little pictures with the date you last touched each. Click one to keep working on it, which is exactly what you want when a repeat customer says "same tumbler as last year, new date." Hover over a card and a small trash can appears; deleting truly throws the file away for good, so save it for experiments you'll never sell.
The design name box in the toolbar (auto-named "Untitled wrap 1" until you rename it). That text in the middle of the toolbar isn't a label — it's a box you can type in. New designs call themselves "Untitled wrap 1" until you click the name and type something you'll recognize in a month, like "Miller family coaster." The name also gets stamped into the file when you export, which is the difference between a Downloads folder full of orders you can find and a wall of mystery PNGs.
The Grid button — graph-paper overlay plus 10-pixel snap while dragging. The Grid button lays faint graph paper over your artboard (light lines every quarter inch, darker ones every inch) and makes things move in tidy little steps while it's on — handy for lining up a row of names dead even. If dragging ever feels "sticky," this is why: Grid is on. Click it again and everything glides free.
Selecting several things at once: Shift-click, dragging a box on empty canvas, and Ctrl/Cmd+A. You can grab several things at once: hold Shift while clicking to add each one, drag across an empty patch of canvas to sweep a box around a group, or press Ctrl/Cmd+A to grab everything. Once they're all glowing, they move, center, and duplicate as one team — the fastest way to slide a whole name-and-date block into place without wrecking the spacing you fussed over.
The quick "AI art" button — a one-picture generator that's separate from Magic Draft. Next to Magic Draft there's a plainer helper: the AI art button (it's also the AI tile in the Insert list). Type what you want — "watercolor hummingbird, splashes of teal" — press Generate, and the picture drops onto your current design as one more layer, a bit less than half the artboard wide. Use Magic Draft to start a whole design from scratch; use AI art when a design that's nearly done just needs one more piece of artwork.
The "Clip to the round blank" checkbox that appears in the Export menu for round templates. When you're on a round blank like a coaster or pet tag, the Export menu grows an extra checkbox: "Clip to the round blank," already ticked. Leave it on and everything outside the circle gets trimmed away, so the file matches the blank exactly — no stray corners printing where there's no coaster. And those dashed guide lines on screen? They never come along in the export, so ignore them at export time.
Rotation helpers: the live degree bubble, Shift for 15° steps, and the automatic snap to straight. While you're turning something with the rotate knob, a tiny bubble shows the exact angle, and the Studio gives a gentle magnetic tug back to perfectly straight when you get close — so "almost level" text doesn't sneak onto a $28 tumbler. Hold Shift to turn in clean 15-degree clicks when you want that deliberate jaunty tilt, or type an exact number in the Rotate box on the right.
Which image files the Image button accepts (and which iPhone photos it won't). The Image button takes PNG, JPEG, WebP, and SVG files. The one that trips people up: photos straight off an iPhone are often a format called HEIC, which the Studio can't read — they'll be grayed out in the picker or refuse to load. Have the phone share or export the photo as a JPEG first (most phones do this automatically when you AirDrop or email it) and it'll drop right in.
Erasing all the letters in a text layer deletes the whole layer. If you double-click a text layer, erase every letter, and click away, the Studio tidies up by deleting the whole layer — including the font, size, and color you'd set up. If you only meant to retype the words, press Ctrl/Cmd+Z to bring it back. Better habit: select the old words and type straight over them instead of clearing the box first.
63D Forge
What this room is: five converters that turn pictures (or plain sentences) into 3D objects — plus a creature generator that designs toys from scratch. No 3D skills needed — if you can pick a photo and drag sliders, you can run it.
Machine:3D PRINTER — everything exports as an STL that Bambu Studio (or any slicer) prints.
What you sell from here: photo night lights ($25–40), name keychains ($8–12), logo plaques ($15–30), filament-painting wall art ($20–45).
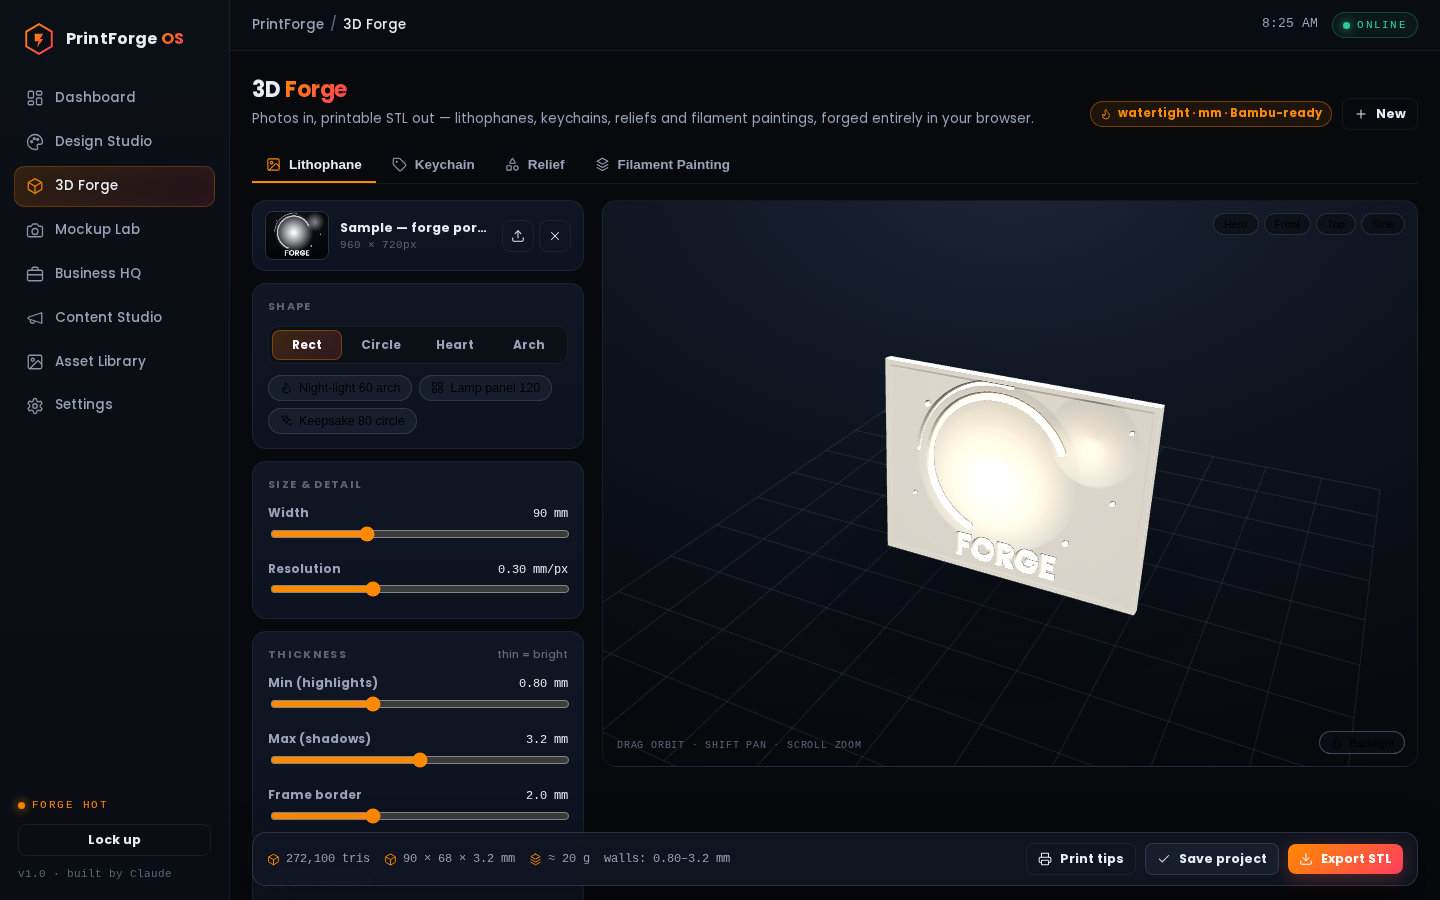
The Lithophane tab with Backlight preview on — this is what the real print does in front of an LED.
How every tab works (same rhythm)
Give it an image — drag a photo in, or click "Try a sample" to play.
Drag sliders — the 3D preview rebuilds live. Spin it with your mouse to inspect.
Check the footer — size in millimeters, weight in grams, any warnings.
Export STL → Chapter 14 takes it from there. Save project keeps your settings + image to re-print anytime.
Tab 1 — Lithophane (the night-light maker)
What it is: the photo becomes a thin white panel where bright parts are THIN and dark parts are THICK. Unlit it looks like frosted plastic; light it from behind and the photo appears like magic. The sell: "text me your favorite photo of your dog → custom night light, $32."
The controls that matter: Shape (Rectangle / Circle / Heart / Arch = classic night light) · the three preset chips (Night-light 60 · Lamp panel 120 · Keepsake 80) do the sizing for you · Width if you go manual · Min/Max thickness = brightness vs contrast (defaults are right; nudge Max up for punchier shadows) · Backlight toggle previews the glow. Print tips live behind the footer button: stand it vertical, solid infill, white PLA.
Tab 2 — Keychain (the impulse-buy machine)
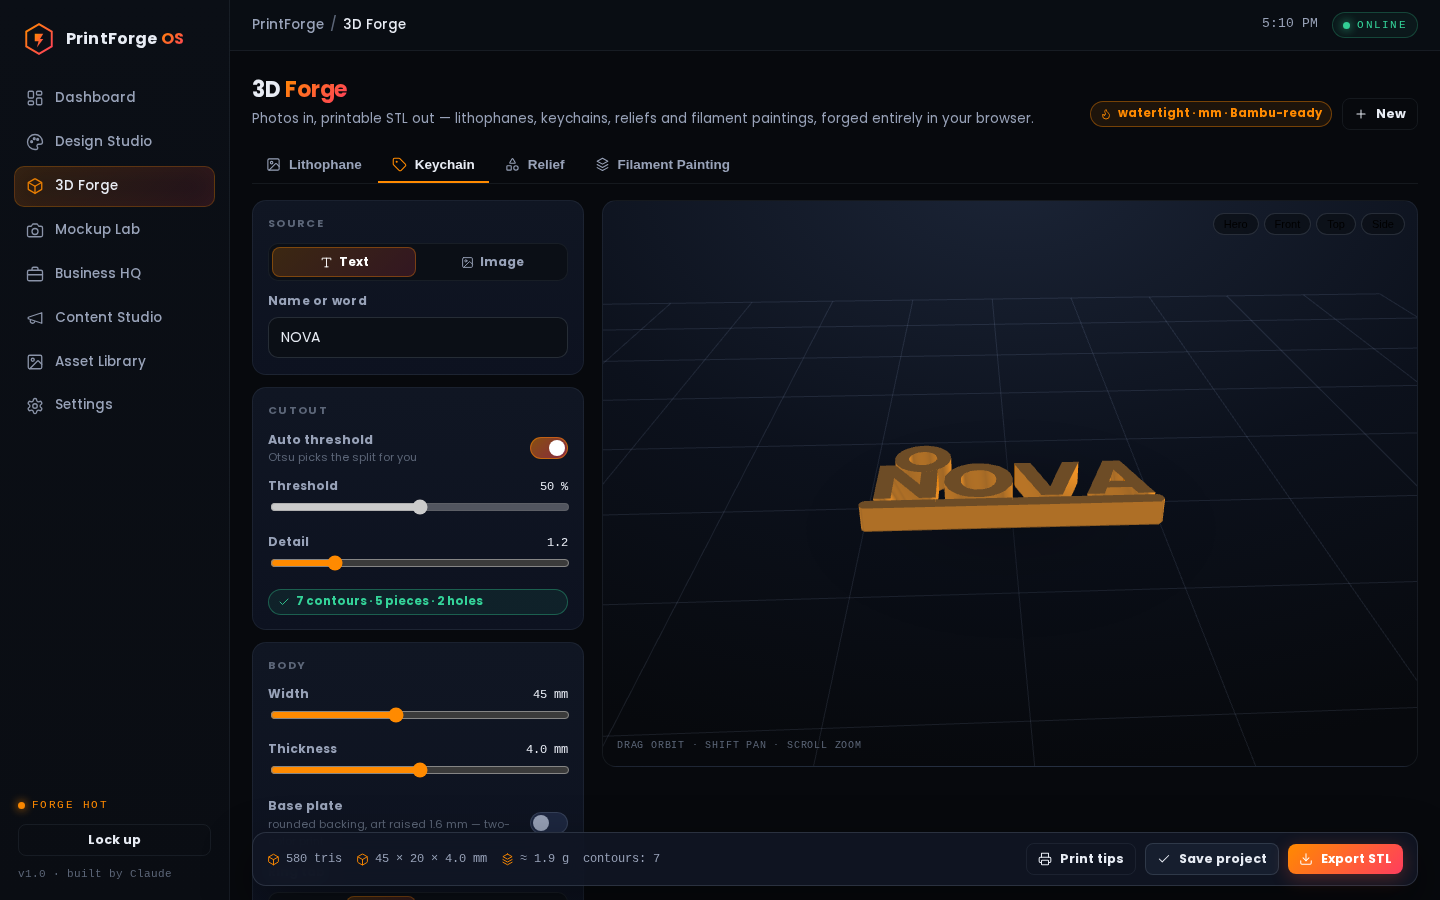
Text mode: type a name, get a one-piece printable keychain with a keyring tab.
Text mode (default): type a name → it renders in thick letters fused into one solid piece with a ring tab (hole fits any keyring). 80 cents of plastic, sells for $10, takes 20 minutes to print — do batches. Image mode: a logo or high-contrast picture becomes a silhouette charm; the Threshold slider decides what's "solid," Detail smooths the edges, and a warning tells you when a photo is too busy (use simpler images). Base plate adds a backing in a second color — the footer tells you which layer to swap filament at.
Tab 3 — Relief (the plaque maker)
What it is: your image raised up out of a solid plate, like the face on a coin (Emboss), or carved down into it (Deboss). Feed it logos or line art, not photos. The sell: business logo desk plaques, team plaques, "Est. 2026" family signs.
Tab 4 — Filament Painting (the showstopper)
What it is: the photo gets rebuilt as flat layers of 2–6 filament colors. Face-on it reads like painted art — nobody believes a printer made it, which is exactly why it stops people at your booth. Pick a palette (Mono / Sunset / Ocean / Forge) or your own colors, and the Swap Plan card lists exactly which layers to change filament at — download it, take it to Bambu Studio (Chapter 14 shows the pause trick), and swap colors when the printer stops. First one takes patience; every one after is routine.
Tab 5 — AI Sculptor new in v1.2
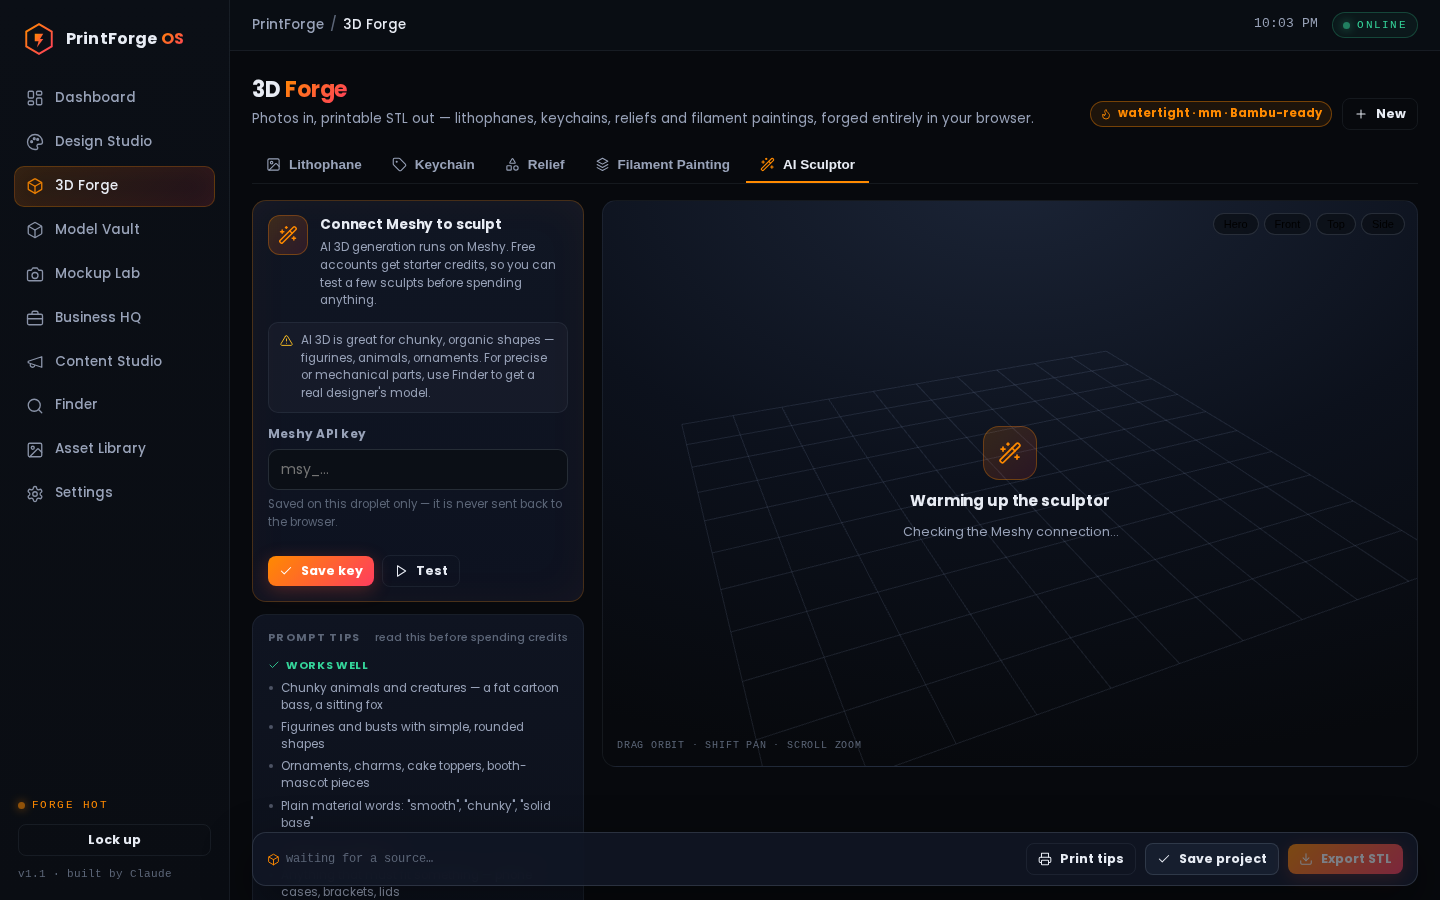
Type "a chunky cartoon bass fish" → a real, printable sculpture lands on the anvil a few minutes later.
What it is: the other four tabs press pictures into mostly-flat shapes. This one sculpts real 3D. You type a sentence — or hand it a photo — and an AI sculpting service called Meshy builds a genuine full-round model. PrintForge downloads it, weighs it, and drops it onto the same spinning preview as every other tool. It's how you make "a sitting fox," "a little dragon," or the mascot a customer just described, without ever learning sculpting software.
One-time hookup (5 minutes, same idea as Magic Draft): the first time you open the tab it asks for a Meshy key. Go to meshy.ai → create a free account → find API keys in your account settings → create one → copy the code that starts with msy_ → paste it in → Save key → Test until the badge goes green. The free plan includes monthly credits — enough to try several sculpts before spending anything. Your key is stored only on your droplet and sent nowhere but Meshy, exactly like the OpenAI key in Chapter 13.
Using it
Pick Describe it (type what you want) or From a photo (upload a picture of a real object — a toy, a drawing, a carving).
Describing? Order like you'd order a toy: "a chunky cartoon bass fish, smooth simple shapes, no text." Chunky and smooth prints beautifully; thin and spiky snaps off in a kid's hand.
Pick a style: Realistic · Sculpture · Cartoon (the rounded toy look — usually the moneymaker).
Hit Generate and go do something else. A sculpt takes a few minutes; the progress bar and timer keep you posted, and it keeps cooking even if you wander off to another tab.
When it lands: spin it, set the size with the slider, then Export STL (Chapter 14 takes it from there) — and click Save to Model Vault so it's filed in Chapter 7's library with "AI made" on the tag.
Why this tab earns money: a sculpt made from your own prompt has no outside designer to owe, so the Vault files it as commercial-use — when someone at the booth asks "could you make a taco holder shaped like our team mascot?", this is how you say yes. One honest footnote: if you're on Meshy's free plan, skim their current terms before a sculpt earns money; their paid plans are the no-questions route.
Tab 6 — Flexi Forge new in v1.3
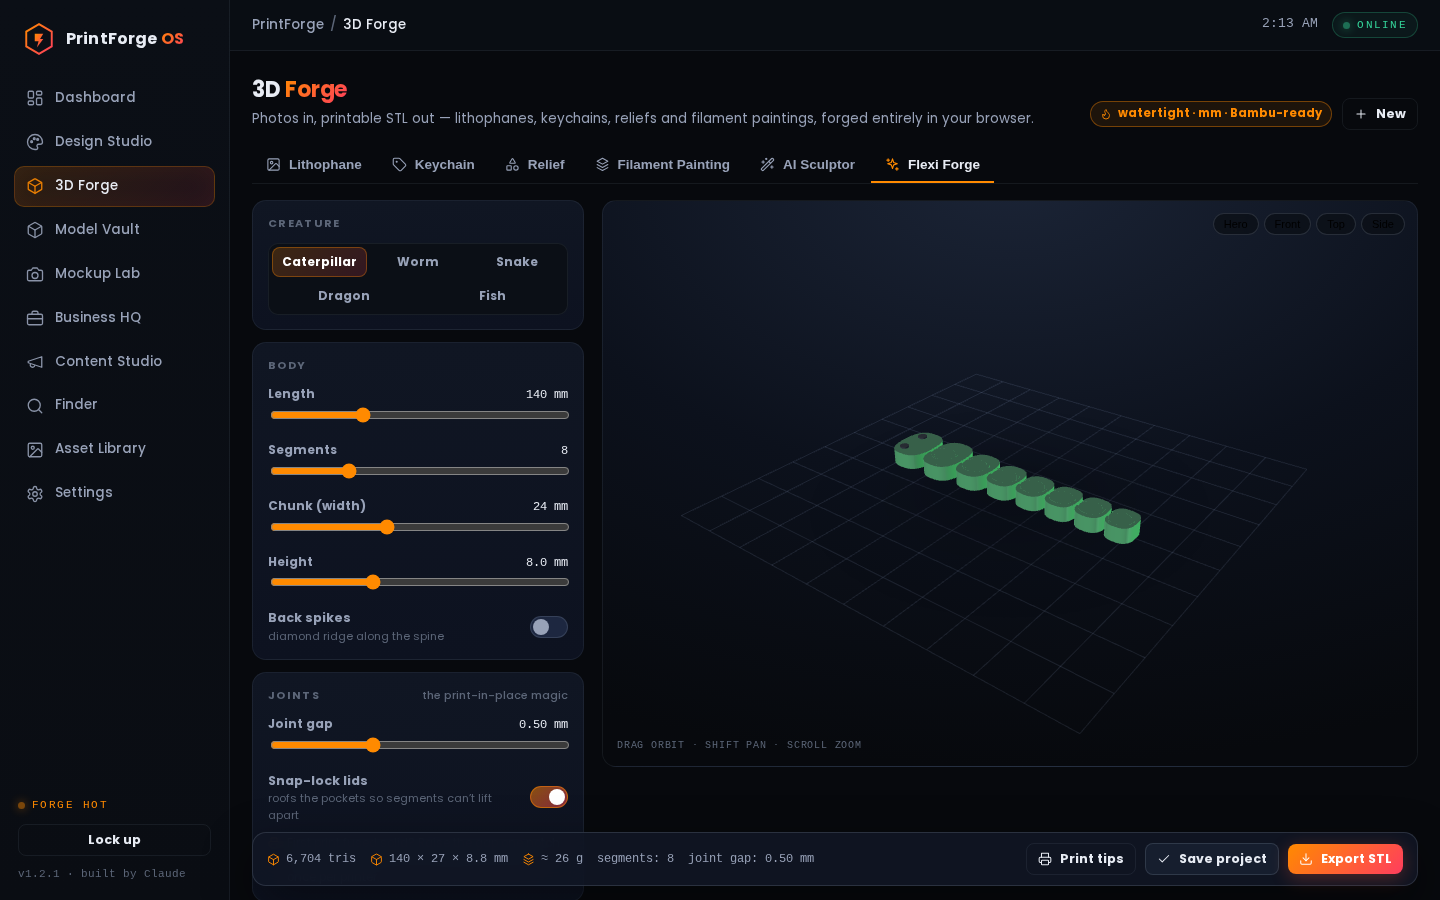
Pick a creature, drag five sliders, export. The chain prints already assembled and wiggles right off the bed.
What it is: a toy designer that needs no drawing, no photo, and no AI credits. Pick a creature — Caterpillar · Worm · Snake · Dragon · Fish — and PrintForge builds a print-in-place articulated "flexi": a chain of chunky segments linked by little mushroom joints, printed as one piece with tiny air gaps so it pops free and wiggles. This is the room that answers the flexi problem from Chapter 11: the good articulated designs cost a membership — yours cost sliders.
The controls: Length and Segments set the creature (a 20-segment snake is a different toy than an 8-segment caterpillar) · Chunk sets how fat it is · Height sets how tall it stands off the bed · Back spikes adds the dragon ridge to anything · two filament colors preview the two-color print. The Joint gap slider is the one that matters: it's the air between moving parts. 0.50 mm is the safe start. If your first print comes out fused solid, raise it one notch and reprint — you tune this once for your printer and never think about it again. Leave Snap-lock lids on: it roofs each joint pocket so segments can't pull apart in a kid's hands.
Why this tab earns money: every flexi you export here is your own design — the Save to Model Vault button files it as commercial-use automatically, no license homework, nothing to check. And it does the one thing no downloaded model can: made to order. "Pick your length, pick your colors" at the booth is a product LittlePrintyCo doesn't have.
The fine print — small things that eventually matter
A sculpt only keeps cooking while you stay inside the 3D Forge room. A sculpt keeps cooking while you hop between the six Forge tabs — but only while you stay inside the 3D Forge room. Wander off to the Dashboard or refresh the page mid-sculpt and PrintForge forgets the job: Meshy still finishes it and still uses the credit, only the model never arrives. So once you hit Generate, stay in the room for the two or three minutes it takes. If you ever see 'Lost contact with Meshy,' the same applies — the sculpt may still finish on their side.
When Meshy sends back an OBJ or GLB instead of an STL, the preview and Export STL switch off. Once in a while Meshy hands its finished model back as an OBJ or GLB file instead of an STL. When that happens the spinning preview stays empty and Export STL grays out — that's normal, not broken. Click the little 'File' button in the Sculpt panel to download it, then drag that file straight into Bambu Studio: it opens OBJ and GLB just as happily, and printing works exactly the same.
'Auto threshold' toggle on the Keychain tab — and why the Threshold slider is grayed out. In the Keychain's Cutout section, 'Auto threshold' is on from the start — the app picks the light/dark split for you, which is why the Threshold slider looks grayed out and won't drag. That's not broken: flip Auto threshold off and the slider wakes up for hand-tuning. The little badge underneath ('3 contours · 1 piece · 2 holes') is the cutter telling you what it found — green means a clean cut, yellow means the picture is too busy for a charm.
The Cancel button on a running sculpt (and what it really does). The progress card has a Cancel button, and it's worth knowing what it really does: it stops PrintForge from waiting, but Meshy usually finishes the sculpt on their end anyway — and the credit is spent either way. Use it when you've changed your mind about the design, not to save a credit. Once the card says 'Downloading the mesh…' the button grays out, because the model is seconds from landing.
The 'Saved forges' shelf, the footer project chip, and the 'New' button. Everything you Save lands on the 'Saved forges' shelf at the bottom of the room — click any card and the whole setup comes back: tool, sliders, and photo, ready to re-print for the next order. Once a project is open its name shows as a small chip by the footer, and every later Save quietly updates that same project; press 'New' (top right) when you want a clean slate. Hover a card for the trash button — deleting a project never touches the STL files you already exported.
The 'Image tuning' group (Invert / Auto contrast / Smoothing) on four tabs. Every image tab ends with an 'Image tuning' group of three quiet heroes. Invert flips lights and darks — the fix when a white-on-black logo cuts backwards. Auto contrast stretches a flat, washed-out photo so the 3D depth actually shows. Smoothing blurs away speckle so a busy photo stops producing noisy, jagged shapes — when the app says 'nudge the threshold, invert, or add smoothing,' these are the switches it means.
The '2D bands' preview chip on the Filament Painting tab. On the Filament Painting tab, the preview has a small '2D bands' chip in its bottom corner (the B key presses it too). It lays a flat picture over the 3D view showing exactly how your photo splits into your chosen filament colors — worth a glance before printing, because if the face or the sunset looks wrong in that flat preview, it will look wrong in plastic. Click it again to go back to 3D.
Picking a Flexi creature rewrites your sliders, and the footer warns about weak joints. When you tap a different creature, the sliders adjust themselves: Segments jumps to that animal's natural count, Dragon flips Back spikes on, and Length may leap up — pick Snake and it goes straight to 230 mm. That's the app protecting the joints: a long chain squeezed into a short body makes joints too small to survive a kid's hands. If you push the sliders anyway, watch the footer — 'Joints are getting tiny' is your cue to add length or drop segments before wasting a print.
Disconnecting or re-testing Meshy after setup. After the hookup, the tab keeps a small Meshy row showing 'Connected' and the last four characters of your key. The Test button is there any time Meshy seems quiet, and the little trash button is 'Disconnect Meshy' — it wipes the key off your droplet and brings back the paste-a-key card, which is how you swap in a new key if you ever regenerate one on meshy.ai. Sculpts you already downloaded stay yours.
The 'Ring tab' position control on the Keychain tab. The keyring hole doesn't have to sit where the app first puts it. The 'Ring tab' row lets you park it at the Left, Top, or Right of the design — handy when a name starts with a letter that looks awkward wearing a ring — or choose None to make a flat charm, magnet blank, or zipper pull with no hole at all.
7Model Vault new in v1.2
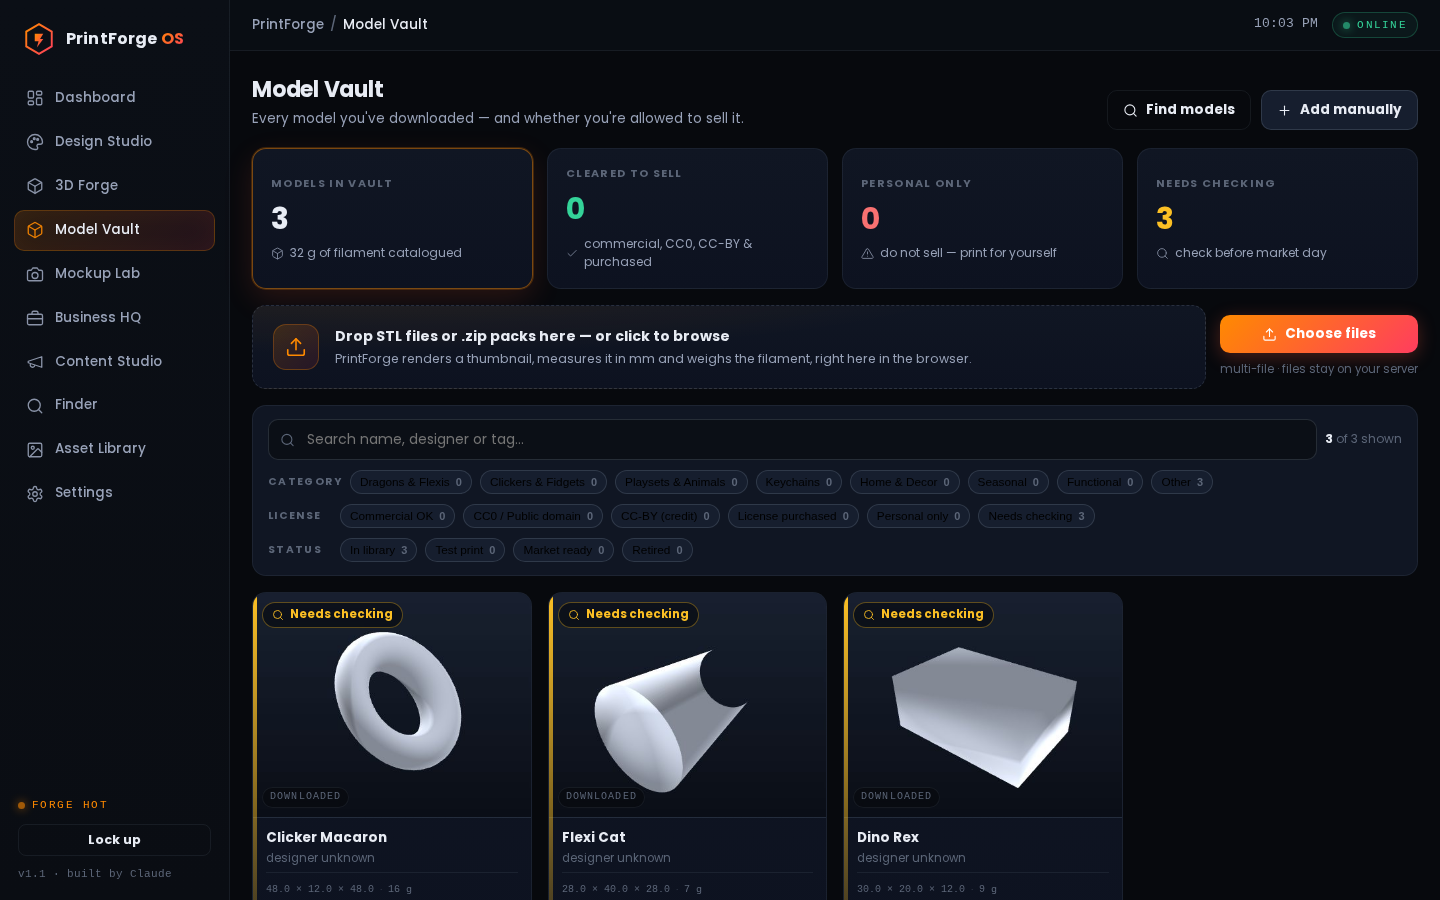
What this room is: the shelf where every downloaded model lives. Hand it an STL — or a whole .zip pack straight from your Downloads folder — and each model gets rendered into a 3D snapshot for its card (it spins live once you open the card), measured in millimeters, weighed in grams, and filed with the one answer that matters: am I allowed to sell prints of this?
Machine:3D PRINTER — every card's file goes to Bambu Studio when it's time to print.
What it earns you: a catalog you can trust on market day. No more "wait… was this one personal-use?" with a customer standing in front of the table.
Every model rendered, weighed, and wearing its license badge. The cards across the top answer "what am I allowed to sell?" in one click.
Why this room exists
By the end of a good download spree you'll own hundreds of files with names like Macaron_Clicker_v3_final.stl scattered across zips. Six weeks from now you will not remember which came from where, or what its license said. The Vault remembers for you. That is its entire job — and it's the room that keeps the whole "download free now, buy the license when I decide to sell" plan honest.
Getting models in (the fun part)
Drag files onto the big drop zone — or click Choose files.
Hand it the .zip packs exactly as they downloaded. No unzipping, no digging for the STLs inside. PrintForge opens the pack on your droplet, pulls out every printable file, and ignores the junk (photos, instructions, gcode).
Watch the cards appear: each model gets rendered for its thumbnail, measured (width × depth × height in mm) and weighed — grams of filament ≈ what it costs you to print, figured at about 2¢ a gram.
Models from a pack keep the pack's name up front — "Cute Mini Dinosaurs — Stegosaurus," never a mystery like "Obj 3."
Big packs are fine. The importer streams zips up to 1GB, so even the 460MB dinosaur pack goes through in one piece. Give it a minute and let the progress line talk.
Import got interrupted? Rescue scan (new in v1.3.3). Card-making happens in your browser one model at a time — if you close the tab or wander to another room mid-import, the files reach the server but some cards never get made. The Rescue scan button (top of the Vault) finds every stranded file, builds its card instantly, then quietly fills in previews and weights. Nothing re-uploads. Rule of thumb: after any big import, if the model count looks short, hit Rescue scan — and next time, leave the tab open until the "rendered and filed" toast.
The license badge — the whole point
Every card wears exactly one badge. Fresh imports all start at Needs checking, because downloading free never automatically means selling is allowed (Chapter 11 has the full sermon). Click a card and set the honest answer:
Badge
What it means at your table
Commercial OK
Sell freely — the designer allows it.
CC0 / Public domain
Sell freely, no credit needed.
CC-BY (credit)
Sell it — but credit the designer on your tag or listing.
License purchased
You bought the right. Keep the receipt logged in the License Vault (Chapter 9).
Personal only
Print for your house, never for your table. The card says so in red, so market-day-you can't miss it.
Needs checking
The honest default. A Check license button on the card sends you off to settle it.
The four big cards across the top — Models in vault · Cleared to sell · Personal only · Needs checking — are clickable filters. Friday night before a market: click Cleared to sell. That's your legal print list. Done.
Click a card — the detail view
The card opens with a live spinning preview and every field: name, where it came from, category (Clickers & Fidgets, Playsets & Animals, Dragons & Flexis…), and a status you move along as you go: In library → Test print → Market ready → Retired.
The price helper: the model already knows its own weight; add the print minutes and the Vault reads your shop numbers from Settings (labor rate, overhead, fees, markup — Chapter 13) and suggests a price with the profit spelled out — the same math as Business HQ's Pricing Lab. It exists to stop you charging $5 for something that costs $6 to make.
The evening ritual that pays for itself: after a download session, open each "Needs checking" card, follow its link, read the license line on the model page, set the badge. Twenty minutes of clicking now = zero legal guessing forever. Chapter 11's license decoder translates the legalese for you.
The fine print — small things that eventually matter
Deleting a model also deletes the STL file from the server — permanently. The little trash can on a card (and the Delete button inside a card's detail view) doesn't just tidy the shelf — it deletes the actual STL file off your server too, and there's no undo. If there's any chance you'll print that model again, set its status to Retired instead of deleting, or make sure you can re-download it from the model page first.
STL and 3MF both get full previews (3MF is new in v1.4). The Vault renders both formats into real thumbnails with weights — 3MF is Bambu Studio's own native format, so the big all-in-one plate files from Printables packs now show up properly. Other printable formats (.obj, .step) still save fine but wear a "Preview unavailable" card — the file is intact, and your slicer opens it happily.
The search box and the Category / License / Status filter chip rows. Under the drop zone sits a search box — it looks through names, designers and your tags — plus rows of little filter chips for Category, License and Status, each wearing a count. Click chips on and off to slice the shelf, and watch the 'shown' tally on the right. If the grid ever says 'Nothing matches those filters,' just hit Clear filters. Worth knowing: the vault remembers your filters even after you visit another room, so a strangely empty shelf usually means a chip is still switched on.
Edits in the detail view only stick when you press Save. After you set a badge or type notes in a card, press the Save button before closing — clicking the X or tapping Esc quietly throws your changes away. This matters most on license night: a badge you picked but didn't Save is still 'Needs checking,' and it won't show up in your Cleared to sell count come market day.
Four hidden buttons appear when you hover over a card. Rest your mouse on any card and four small buttons fade in over the picture: open the model's web page, download the STL, edit details, and delete. They hide until you hover so the shelf stays clean — so if you're hunting for a download button and can't see one, that's where it lives. Clicking anywhere else on the card opens the full detail view.
'Covered by' and 'Proof link' — attaching license evidence to a model. Inside a card, next to the License dropdown, 'Covered by' lets you point the model at one of the licenses you've logged in Business HQ's License Vault — your Cinderwing membership, say — and 'Proof link' holds a receipt or screenshot address. Fill these in when you set the badge, and if anyone at a market ever asks 'are you allowed to sell that dragon?', your answer and your proof are one click apart.
'Add manually' — filing a model with no file attached. The 'Add manually' button at the top of the room lets you file a model you haven't downloaded yet — a dragon you spotted on your phone, a file still sitting on a USB stick. Give it a name and where it lives, and it sits on the shelf showing 'no file yet — drop the STL' so you don't lose track of it. When you download the real file later, drop it in and it gets rendered and weighed like everything else.
Files over 25MB don't auto-load the spinning 3D preview. If a model's file is bigger than about 25MB, its detail view shows the flat picture instead of the live spinning preview, along with a note that it's 'a heavy mesh' and a Load 3D preview button. Nothing is broken — big files can make the browser pause, so the vault waits for your say-so. Click the button whenever you actually want to spin it and look closely.
One import batch at a time — a second drop during an import is ignored, not queued. While cards from one drop are still spinning up, the vault won't take another handful — you'll see 'Still importing the last batch,' and those new files are set aside, not queued. Nothing was lost from your Downloads folder; just wait for the batch to finish and drop them again. On a big download night, feed it one zip at a time and let it chew.
A file that won't render is still saved — the 'Preview unavailable' placeholder card. Once in a while a downloaded file is a bit mangled and won't draw on screen. The vault keeps it anyway — you'll see a card with a small orange wireframe cube saying 'Preview unavailable — file saved, open it in your slicer.' The STL itself is safe on your server; it just couldn't be pictured or weighed, so try opening it in Bambu Studio before deciding it's a dud.
Press / to jump to the vault's search box. Tap the / key anywhere in the vault and your cursor jumps straight into the search box, ready to type. Once the shelf holds a few hundred models, it's the fastest road from 'where's that axolotl?' to the card.
8Mockup Lab
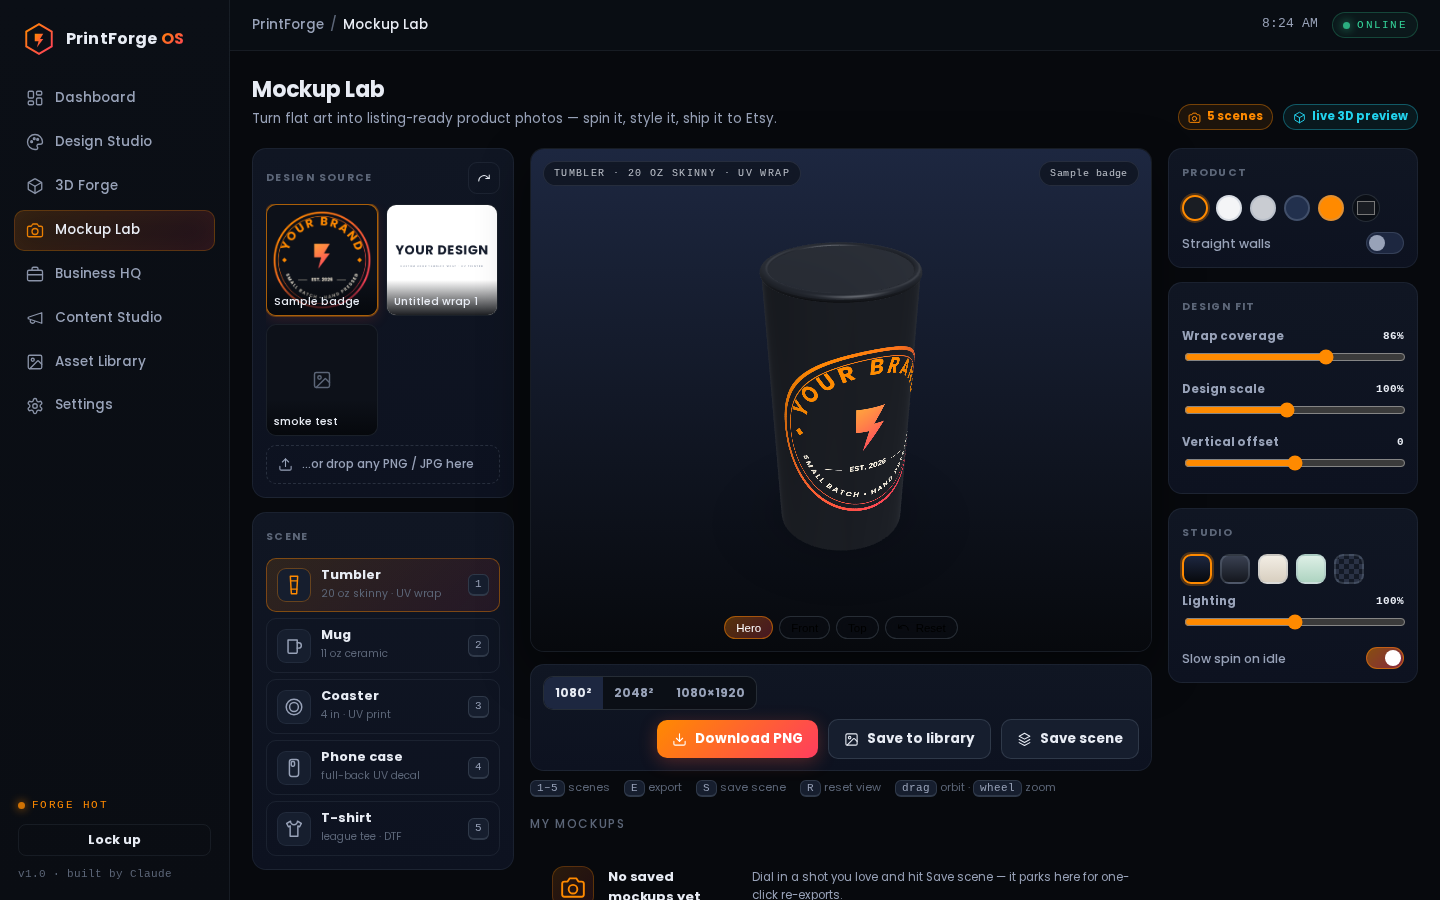
What this room is: a photo studio with no camera. It wraps your flat designs onto realistic 3D products so you get listing-quality photos of things you haven't printed yet. It talks to no printer — the output is pictures, not products.
Machine:NONE
What it earns you: the photos that SELL the products — Etsy listings, Instagram posts, "here's what yours will look like" messages to customers before you commit a blank.
A saved design wrapped on the 3D tumbler. Spin it, restyle it, export a square for Instagram.
Why fake photos are how real products sell
Customers buy from pictures. Pros never photograph every color/name variant — they render them. When Maria asks "what would it look like with Bella's name in pink?", you change the text in Design Studio, save, open Mockup Lab, and text her a product photo in two minutes. That preview closes the sale before you print anything.
Using it (three clicks)
Pick the design (left) — your saved Design Studio work appears automatically (that's why we always save). Or upload any image.
Pick the scene: Tumbler · Mug · Coaster · Phone case · T-shirt (keys 1–5). Then style it: product color (matte black, stainless…), background (Forge dusk / Studio / Cream / Mint / Transparent), design size/position sliders, lighting.
Export: choose 1080² (Instagram), 2048² (Etsy), or 1080×1920 (story) → Download PNG — or Save to library to stash it in the Asset Library. Save scene remembers the whole setup for one-click re-exports later.
The shirt scene is special: it's a drawn shirt (not 3D) with realistic folds; on dark shirts it automatically switches your design to a white-ink look, exactly like real DTF printing behaves.
The fine print — small things that eventually matter
The "My mockups" strip — where saved scenes live, how to reopen and delete them. Every time you hit Save scene, the shot parks as a card in the "My mockups" row at the bottom of the page — before the next market drop, click the card and the whole setup comes back (product, color, backdrop, fit) ready to re-export in seconds. To tidy up, hover over a card and click the little trash can; deleting a saved scene never touches the PNG photos you already downloaded. One heads-up: if you deleted the design a scene was built on, it reopens wearing the sample badge, so re-pick your art before exporting.
"Update" vs "Save as copy" when re-saving an opened mockup. The first time you press Save scene you just name it and save — but if you're working on a mockup you already saved, the box changes: "Update" overwrites that saved scene with your changes, while "Save as copy" keeps the old one and adds a fresh card. Reach for Save as copy when you want, say, a navy version and a black version side by side; knowing the difference stops you accidentally writing over a setup you loved.
Camera controls on the preview: drag to spin, wheel to zoom, and the "Hero" / "Front" / "Top" / "Reset" buttons. The preview is a photo studio you can walk around: drag with the mouse to spin the product, roll the wheel to zoom, and the Hero / Front / Top buttons under the product snap to ready-made angles — Hero is the classic three-quarter listing shot. Lost the product off-screen? The Reset button (or the R key) frames it back up perfectly. These buttons disappear on the T-shirt because it's a drawn shirt rather than a 3D one — nothing is broken.
T-shirt toggles: "White-ink underbase" and "Show print zone" (and that the guide never exports). The shirt scene has two switches of its own. "White-ink underbase" mimics how DTF prints sit on dark fabric — it flips itself on for dark shirts and off for light ones, and you can override it if a design reads better the other way. "Show print zone" draws a dashed guide marking the real 12 × 16 inch printable area so you can check your art actually fits a shirt — and relax, the guide is preview-only and never shows up in the photo you download.
The "Wrap coverage" slider (Tumbler and Mug) — and why it becomes "Rotation" on the other scenes. On the tumbler and mug there's a slider the others don't have: Wrap coverage, which decides how far around the cup your art hugs — 100% wraps it nearly all the way like a full UV wrap, lower numbers keep it to a front panel. Switch to the coaster, phone case or shirt and that slider is swapped for Rotation, which tilts the art up to 45° either way. So don't hunt for a "missing" slider — each product only shows the moves that make sense for it.
Product shape options: "Straight walls" (Tumbler) and "Round" / "Square" (Coaster). Two products can change shape to match what's actually in your blank bin: the tumbler has a "Straight walls" switch (off is the classic tapered skinny, on is straight-sided), and the coaster offers Round or Square buttons. Matching the mockup to the real blank means the customer's photo matches the thing they unwrap — no "this isn't what the picture showed" messages.
The custom color dot at the end of the color swatches. The five color dots are the popular blanks, but the extra round dot at the end of the row opens a full color picker — so when the bowling league says "our green, exactly," you can dial in their precise shade instead of settling for the presets. It's the difference between "close enough" and a mockup that looks like you already made their shirt.
"Slow spin on idle" toggle (the automatic turntable). On the 3D scenes the product gently rotates on its own like a turntable — handy for checking every side of a wrap. If the motion distracts you while you fine-tune, flip "Slow spin on idle" off in the Studio panel; and if the product never spins on your computer, this same switch is the answer — it starts off by itself when the computer's "reduce motion" setting is turned on.
The built-in "Sample badge" starter design. The first time you open the lab, the product is already wearing a round "YOUR BRAND" badge — that's not your art and it isn't stuck there. It's a built-in sample so the room never looks empty and you can play with colors, angles and backdrops before you've saved a single design. The moment you click one of your designs (or upload one), it takes the badge's place.
Upload rules and the white-box gotcha (PNG with transparency works best). When you upload your own art, use a PNG with a transparent background whenever you can — a JPG always carries a solid rectangle behind the art, so on the tumbler your logo ends up trapped in a white box instead of sitting straight on the metal. If the drop box refuses a file, it only takes pictures (PNG or JPG), and the app nudges you with the same advice: "PNG with transparency works best."
What the checkerboard means on the "Transparent" backdrop. Pick the "Transparent" backdrop and the stage fills with gray checkerboard squares — those squares are the universal sign for "nothing here," and they never appear in your photo. The PNG you download has a see-through background, which is exactly what you want for dropping the product onto a flyer, a story graphic, or a photo of your own market table.
The "WebGL is unavailable" state (four scenes grayed out). On the odd computer or browser with 3D graphics switched off, Mockup Lab will say "WebGL is unavailable here — 3D scenes are off, the T-shirt still works": the tumbler, mug, coaster and phone buttons gray out and only the shirt runs. Nothing is broken or lost — try a different browser, or turn the browser's hardware acceleration back on, and the 3D products come right back.
9Business HQ
What this room is: the money brain — six tabs that replace the spreadsheet, the sticky notes, and the "wait, what did I charge last time?"
Machine:NONE
What it earns you: real prices instead of guesses, no forgotten orders, no surprise empty blank bins, proof you sell legally, and the payback bar's fuel.
Keys 1–6 jump between tabs; N makes a new thing in every tab except the Pricing Lab (a calculator has nothing to add).
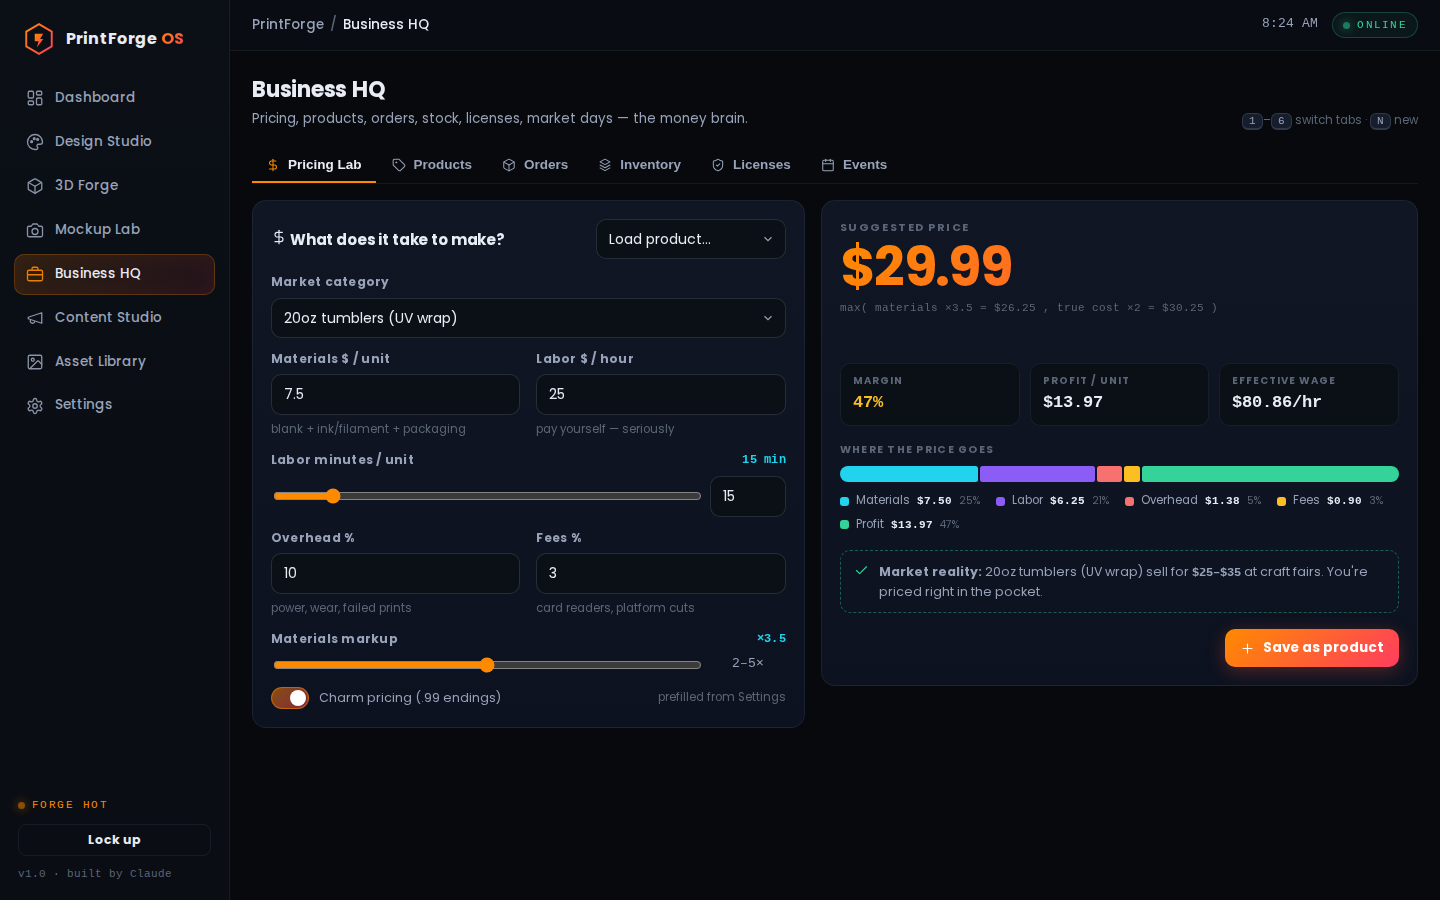
Tab 1 — Pricing Lab (use before selling anything new)
Costs in the left column; the price you should charge — and why — on the right.
Type what ONE item costs you (materials), how many minutes of your hands it takes, and your hourly rate (from Settings). The big orange number is the price to charge — it takes the HIGHER of "materials × markup" or "true cost × 2," so neither cheap materials nor slow labor can trick you into working for free. Below it: your margin, profit per item, and effective hourly wage; the colored bar shows where every dollar of the price goes; the hint line tells you what this item type actually sells for at fairs so you know you're in the pocket — and as of v1.3 it knows the whole 2026 lineup: clickers ($5–10), mini animal figures ($2–6), flexi creatures ($10–20) and custom AI figurines ($15–30), alongside the original tumbler/coaster/keychain/litho benchmarks. Save as product puts it in your catalog.
Rule of thumb: if margin shows under 50% (amber badge), raise the price. Craft buyers pay for personal — they are not comparing you to Walmart.
Tab 2 — Products
Your menu. Each card: photo, cost → price, margin badge (green good / amber thin / red fix-it). Add products here or from the Pricing Lab; the Orders tab pulls from this list so order math fills itself. New in v1.3 — the ✨ Starter catalog button: one click loads the whole 2026 lineup (clickers, mini animals, dinos, flexis, keychains, night lights, tumblers, coasters, pet tags) with honest starting costs, prices, and a license note tucked in each product's Notes (open the card with the pencil to read it) telling you whether it's sellable as-is or needs a license bought first. It never duplicates — click it twice and it just tells you everything's already there. Treat its numbers as starting points: when you know your real blank costs, open each product with the pencil and tune it.
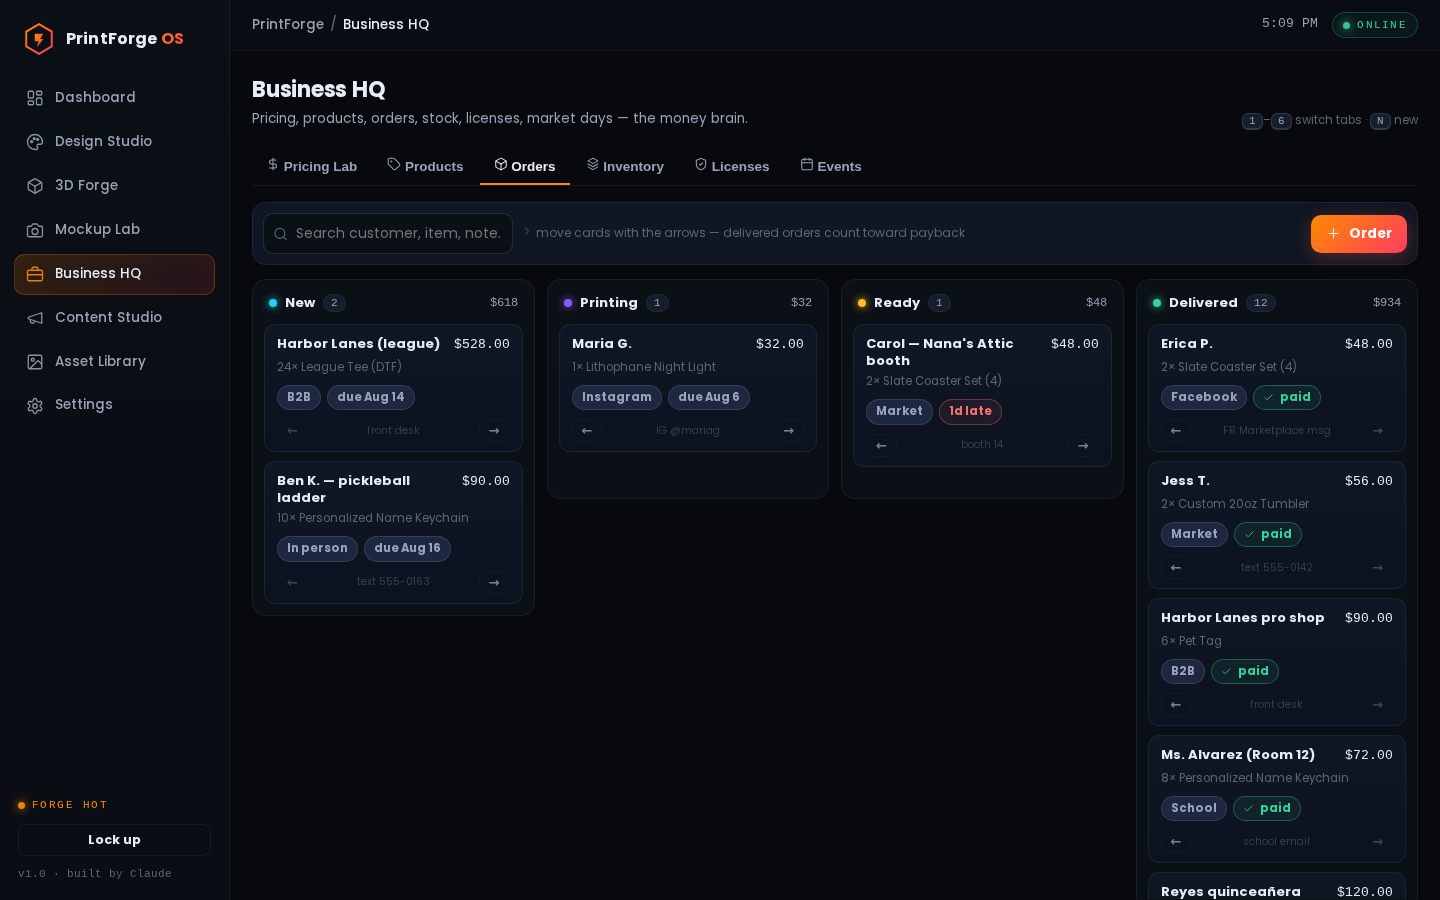
Tab 3 — Orders (the board)
Every order is a card moving left to right: new → printing → ready → delivered.
Four columns, one card per order. + Order: customer, where it came from (in person / Instagram / B2B…), due date, and line items picked from your products (totals compute themselves). Move cards with their arrow buttons as work progresses. Overdue due-dates turn red. Delivery is the moment the money lands on your Dashboard and payback bar; Mark paid is the bookkeeping truth on top (a paid-early order counts too — either signal registers), so don't skip it. This board is the first thing to check every morning after the Dashboard.
Tab 4 — Inventory
Blanks, filament, ink — with quantities you adjust via +/− steppers as stuff gets used. Set each item's "low at" number and the app warns you (here and on the Dashboard) before you show up to a market with three tumblers. The reorder link jumps straight to your supplier.
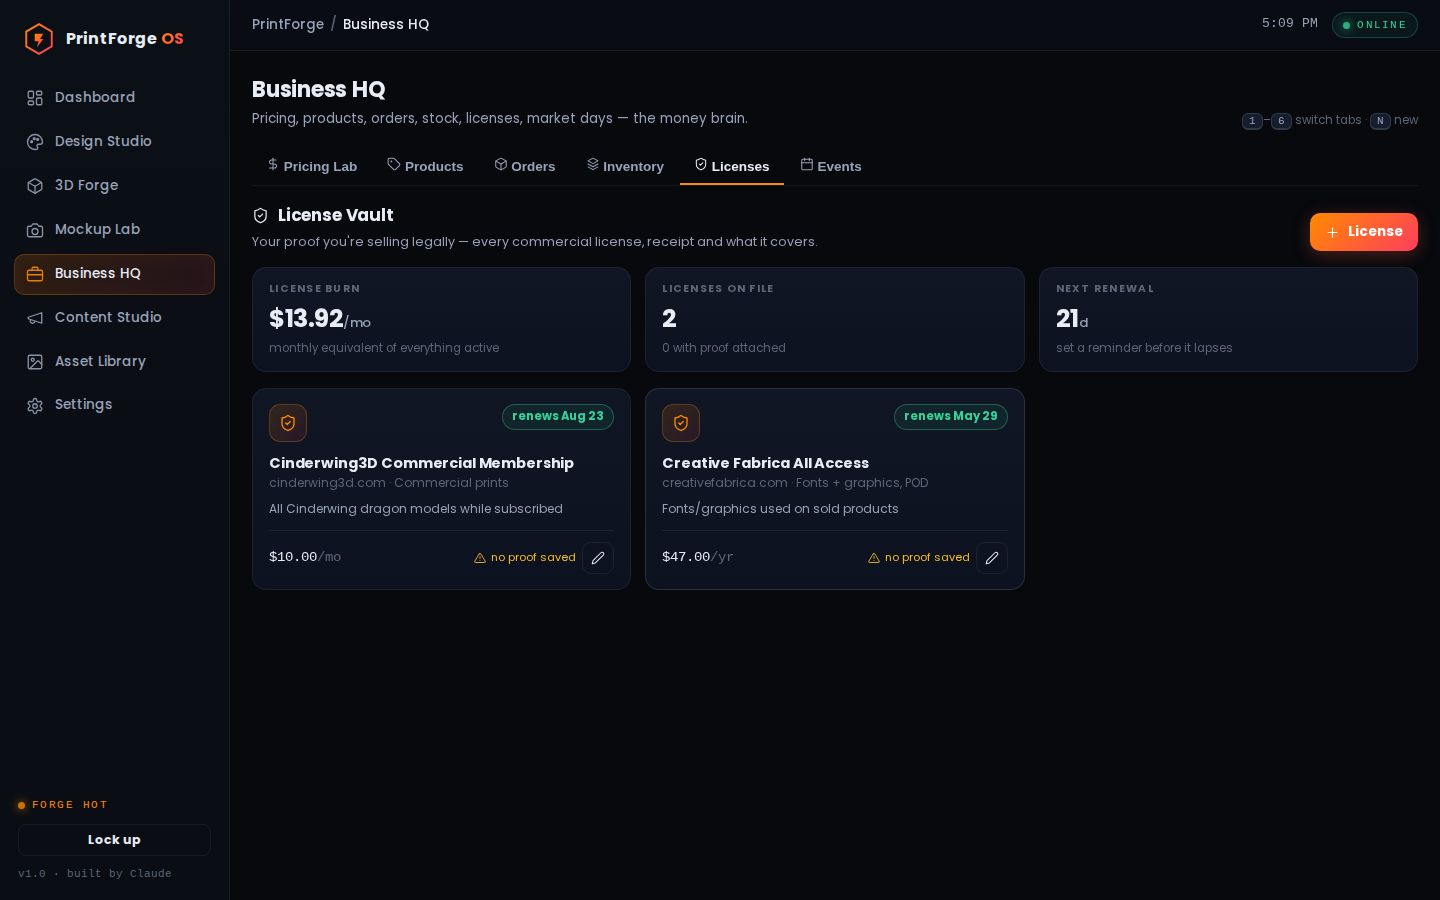
Tab 5 — Licenses (the receipts room)
One card per license — with proof links and renewal countdowns.
Every "am I allowed to sell this?" answer lives here: your Cinderwing3D membership, Creative Fabrica sub, any model license you buy through the Finder. Store the proof link, cost, and renewal date; badges count down renewals and the burn KPI totals your monthly licensing spend. If anyone ever questions a dragon on your table, you open this tab and smile.
Tab 6 — Events
Book markets as Upcoming (date, venue, booth fee — a countdown appears everywhere). After each market, Log results: revenue and costs → it computes the day's profit into your totals. A few markets in, the stats (average per event, best day 🔥) tell you which venues deserve you again.
The fine print — small things that eventually matter
The "Load product…" dropdown and "Update product" button in the Pricing Lab (re-pricing existing products). The Pricing Lab isn't just for new ideas — it's how you give old prices a checkup. Pick anything from the "Load product…" menu at the top and its numbers pour into the calculator, with a little badge comparing what you charge today against what you should. When filament or blanks get pricier, one press of "Update product" writes the new price onto that product everywhere — no retyping, no forgetting.
The order form's "Materials & labor" cost box and "Est. profit" — the number that decides how much an order feeds the payback bar. In the middle of every order form sits a "Materials & labor" box — what this order costs you to make. It fills itself when your line items come from the Products list, but for custom items give it an honest guess. It matters more than it looks: profit is the sale total minus this box, and that profit is exactly what the order pours into the payback thermometer. Leave it at zero and the bar celebrates money you didn't really keep.
Archiving products — the "Show archived" toggle, the hover Archive/Restore buttons, and the "Active" switch. When a product retires — Christmas stock in January, or something that never sold — don't delete it, archive it. Hover its card and click the little box button next to the pencil: it dims, steps out of your menus and order forms, but keeps every bit of its history. Flip on "Show archived" in the toolbar to visit retired products, and the same button (now an undo arrow) brings one back for next season.
The "Charm pricing (.99 endings)" switch in the Pricing Lab. Ever wonder why the big suggested price always ends in .99? That's the "Charm pricing" switch, and it's on because $27.99 genuinely sells better than $28 — shoppers' eyes read the 27, not the 99. If you'd rather deal in clean whole dollars at the cash box (much easier change-making at a busy booth), flip it off and prices round to the nearest dollar instead.
"Custom item…" in the order line-item picker, plus "Add item" and the per-line remove button. Someone at the booth asks for something that isn't on your menu yet? In the order's line items, choose "Custom item…" from the product dropdown — a name box appears so you can type the one-off thing and set its price by hand. "Add item" stacks more lines onto the same order, and the little x takes one away. This is how quirky requests get captured instead of forgotten.
Search boxes and category filter chips on the Products, Orders and Inventory tabs. Once your lists grow, the toolbar at the top of Products, Orders and Inventory earns its keep: type in the search box and the list filters as you type, or click a category chip (like "3D" or "Filament") to see just that shelf. One heads-up: a chip stays pressed until you click "All" again — so if a list ever looks strangely empty, glance up and see which chip is lit.
Where Delete lives — the red Delete button inside every edit window, with an are-you-sure prompt. Nothing in Business HQ has a delete button sitting out on its card — that's deliberate, so a stray click can't erase an order. To remove something for real, open it (the pencil or a click) and use the red "Delete" inside the window; the app always asks "are you sure?" because deletes don't come back. For products, archiving is almost always the kinder choice — and keep expired licenses on file if you still sell those prints.
The "Log results" button only appears on or after the event day. Don't hunt for "Log results" before market day — it politely stays hidden until the event date arrives, then appears on the card, ready for the drive home. Until then the pencil is your only button (fine for fixing the fee, venue or packing notes). Once you log the take, the event slides over to Past & results and its profit joins your totals and the payback bar.
The red "underwater" warning badge in the Pricing Lab. If a red "underwater" badge surfaces beneath the colored bar, the math is telling you this item would pay you nothing — the price doesn't even cover materials, your time and the card fees. Don't sell it like that. Nudge the price up or find a way to shave minutes off the making, and watch the badge sink away.
Adding a photo to a product (the file picker in the product window). Product cards look their best wearing real photos. Open any product, find the Photo row, and use the file button to pick a picture from your computer or phone — it uploads on the spot and becomes the card's cover. A quick snap of the finished item pays off at order time too: you and the customer are pointing at the same thing.
The amber "no proof saved" warning on license cards. A license card wearing the amber "no proof saved" note is a promise without a receipt — if anyone ever questioned a dragon on your table, you'd have nothing to show. Open the card's pencil and paste a link to the receipt email or license page into "Proof link"; the warning becomes a Proof button that opens your evidence in one click.
10Content Studio
What this room is: the social-media engine — it writes the hooks/captions/shot lists, keeps the posting calendar, packs your market-day checklists, and holds the house rules for filming your daughter.
Machine:NONE
What it earns you: the audience — which becomes custom orders, which becomes the payback bar moving.
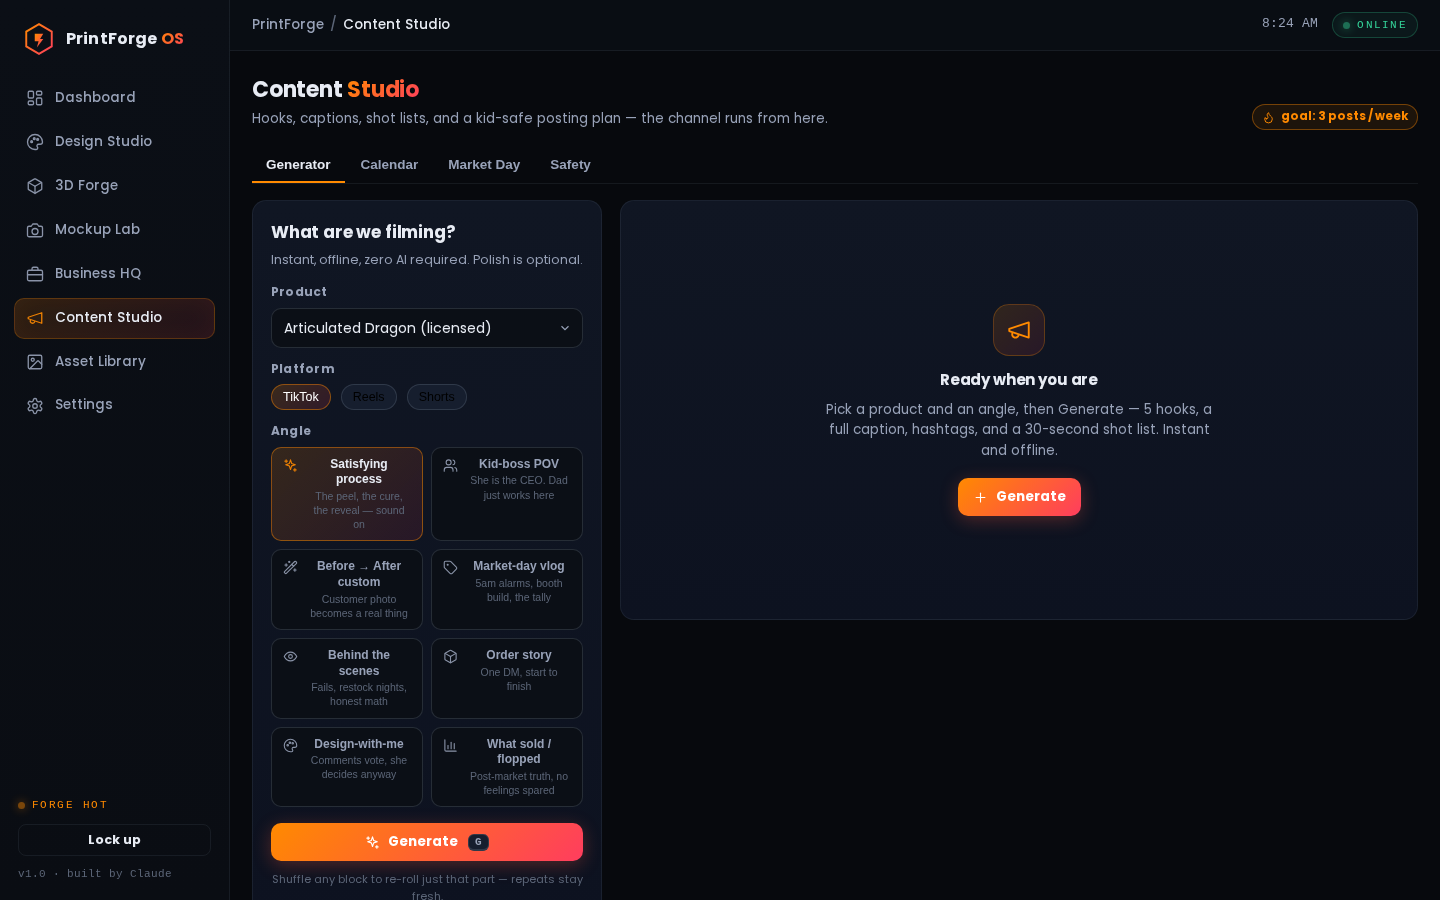
Pick a product and an angle; Generate writes the video plan.
Generator
Pick a product, a platform, and one of eight angles (Satisfying process · Kid-boss POV · Before→After · Market-day vlog · Behind the scenes · Order story · Design-with-me · What sold/flopped) → Generate. You get 5 hooks (click one to build the caption around it), a full caption with call-to-action, hashtags, and a 6-step phone-filmable shot list. Copy buttons everywhere; shuffle re-rolls any block; Send to Calendar banks the idea. "Polish with AI" is optional gloss once your key is connected.
Calendar
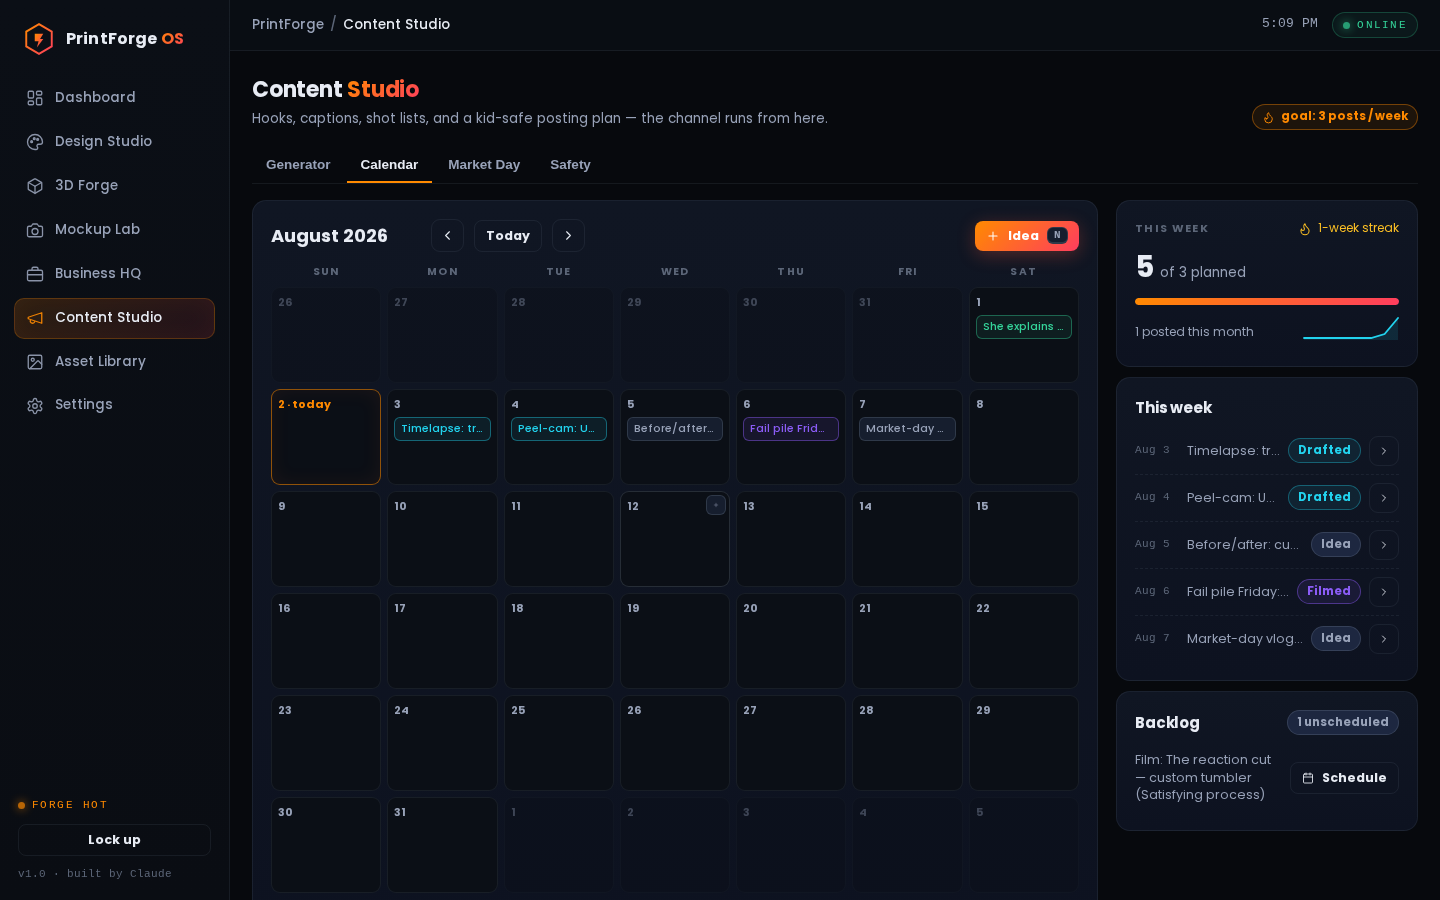
Chips change color as an idea becomes a draft, a filmed clip, a posted video.
Every idea is a chip on a month grid, colored by status: idea (grey) → drafted (cyan) → filmed (violet) → posted (green). Hover a chip to advance it one stage; click to edit. The side panel tracks your week against the goal (default 3 posts — change in Settings), your streak, and the Backlog of undated ideas waiting for a slot. The goal isn't virality; it's showing up — 3 posts a week, every week, is how accounts grow.
Market Day
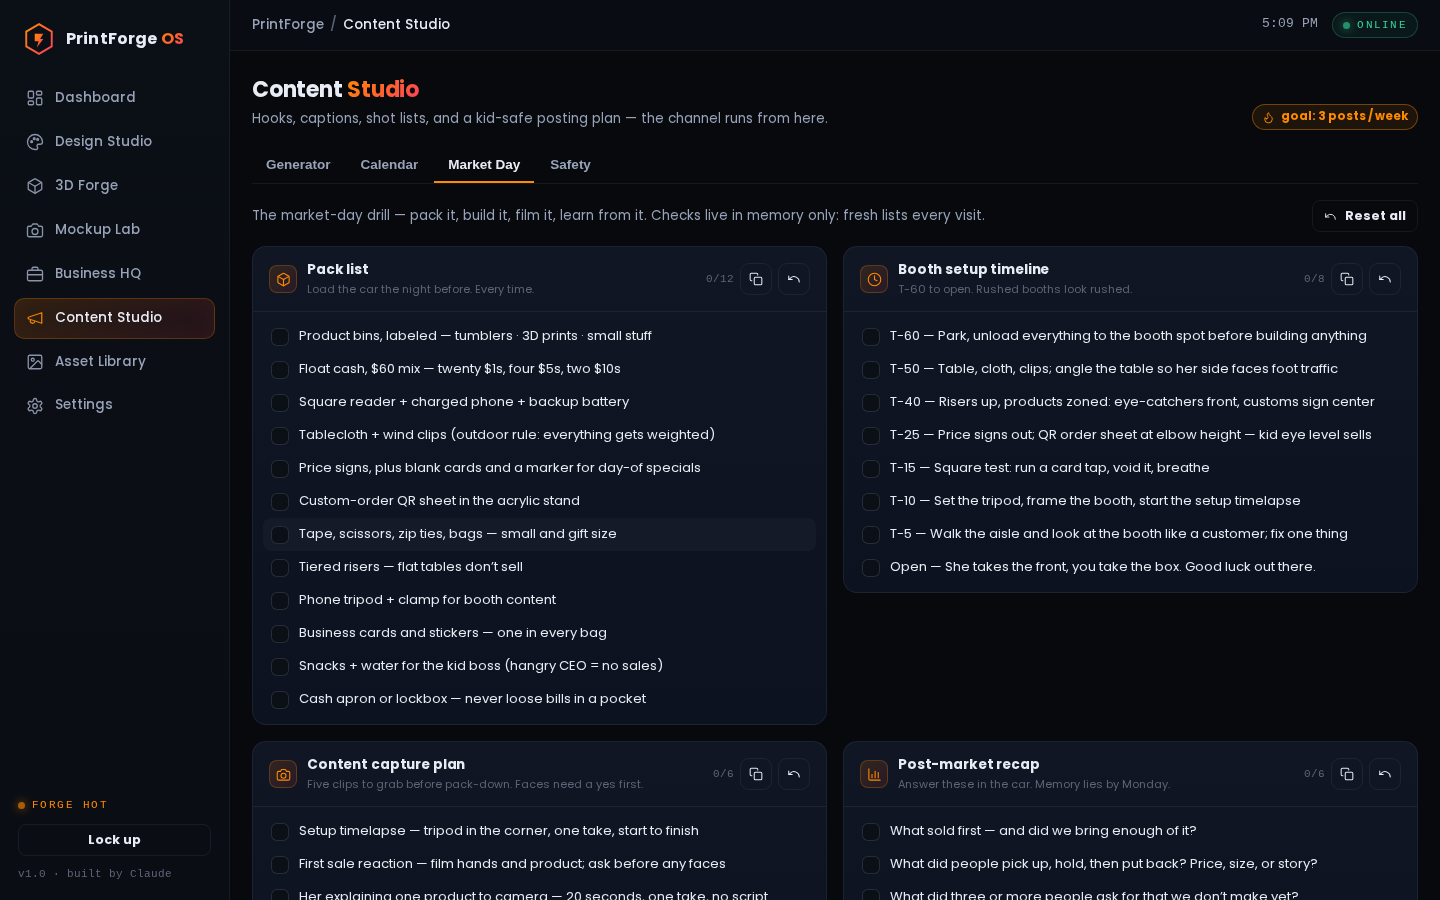
Pack list, setup timeline, the five clips to capture, and recap prompts.
Four checklists that make market mornings brainless: what to pack (including a $60 cash-float breakdown), the T-minus-60 booth setup timeline, the five clips to film during the day, and the recap questions for the drive home. Check things off as you load the car; checkmarks reset next visit (each market starts fresh) — the lists themselves are permanent.
Safety (read together once)
The house rules for her being the face: you own and run every account · no school names/uniforms/street clues in frame · post after leaving, never live location · first name only · you handle 100% of DMs and comments · no solo livestreams · part of her earnings goes to her savings · and she can veto any clip, any day. Plus a 10-second sweep to run before anything posts. It's phrased as pride, not fear — because handled right, this is the best business class a 10-year-old ever took.
The fine print — small things that eventually matter
Deleting a post idea — the Delete button inside the edit window. Changed your mind about an idea? Click its chip on the calendar to open it, and you'll find a Delete button at the bottom of the window. The app asks you to confirm first, because there is no undo — a deleted idea is gone for good. If you only might want it later, clear its date instead and let it wait in the Backlog.
The Backlog panel only lists the first 8 unscheduled ideas. The Backlog badge counts every idea you've banked, but the panel only shows the first eight — so if it says "12 unscheduled" and you can only count eight, the rest aren't lost. Schedule or delete a few and the others rise into view. Treat it as a gentle push: the Backlog is a waiting room, not a storage unit, so give good ideas a date while they're fresh.
The edit window's full set of fields — Platform, Format, "Link (once posted)", and Notes. Click any chip and there's more inside than a title. You can set the platform (including Facebook and Other) and the format (Reels, Vlogs, Photos, Carousels, Stories — not just Shorts), and the Notes box is where captions you send over from the Generator are kept. Best of all is "Link (once posted)": paste the video's web address there after it goes live. Months later, when a customer says "I saw that dragon video," your calendar knows exactly which post they mean.
Adding an idea straight onto a calendar day — the hidden hover "+" and the "Idea" button. You don't have to go through the Generator to plan a post. Float your mouse over any day on the calendar and a little + appears in the corner — click it and a fresh idea window opens, already set to that date. The Idea button at the top (or just pressing N) does the same for today. It's the quickest way to pin "film the market recap" onto Saturday before it slips your mind.
The "+N more" link on busy calendar days. A calendar square only has room for three chips. Plan a fourth post on the same day and the extras tuck themselves behind a small "+1 more" link — click it to see the whole day's list and open any of them. Nothing has vanished; the month view just folds busy days up to stay readable.
The "Something else…" option in the Generator's Product dropdown. The Product list isn't limited to what's already in your catalog. Scroll to the bottom, pick "Something else…", and a "Describe it" box appears — type whatever you're filming, press Enter, and the Generator writes hooks and a shot list for it on the spot. Perfect for one-off custom orders, or for test-driving a product idea on camera before you ever commit to making stock of it.
Market Day's per-list "Copy as text" button (plus the Reset buttons). Checkmarks on these lists wipe themselves clean every visit — so if you want a list to travel with you, tap the little copy button on its card. It copies the whole checklist, ticks included, as plain text you can paste into a note or text to your own phone. Pack the car at 5am from your phone; back home, the app's copy has already reset itself, ready for the next market.
Arrow keys flip calendar months; the "Today" button jumps back. On the Calendar tab, the left and right arrow keys page through the months — handy when you're sketching out next month's plan. Wandered too far ahead? The Today button between the two arrows snaps you straight back to the current month. (Like G and N, these keys only work while you're on their own tab.)
11Finder new in v1.1
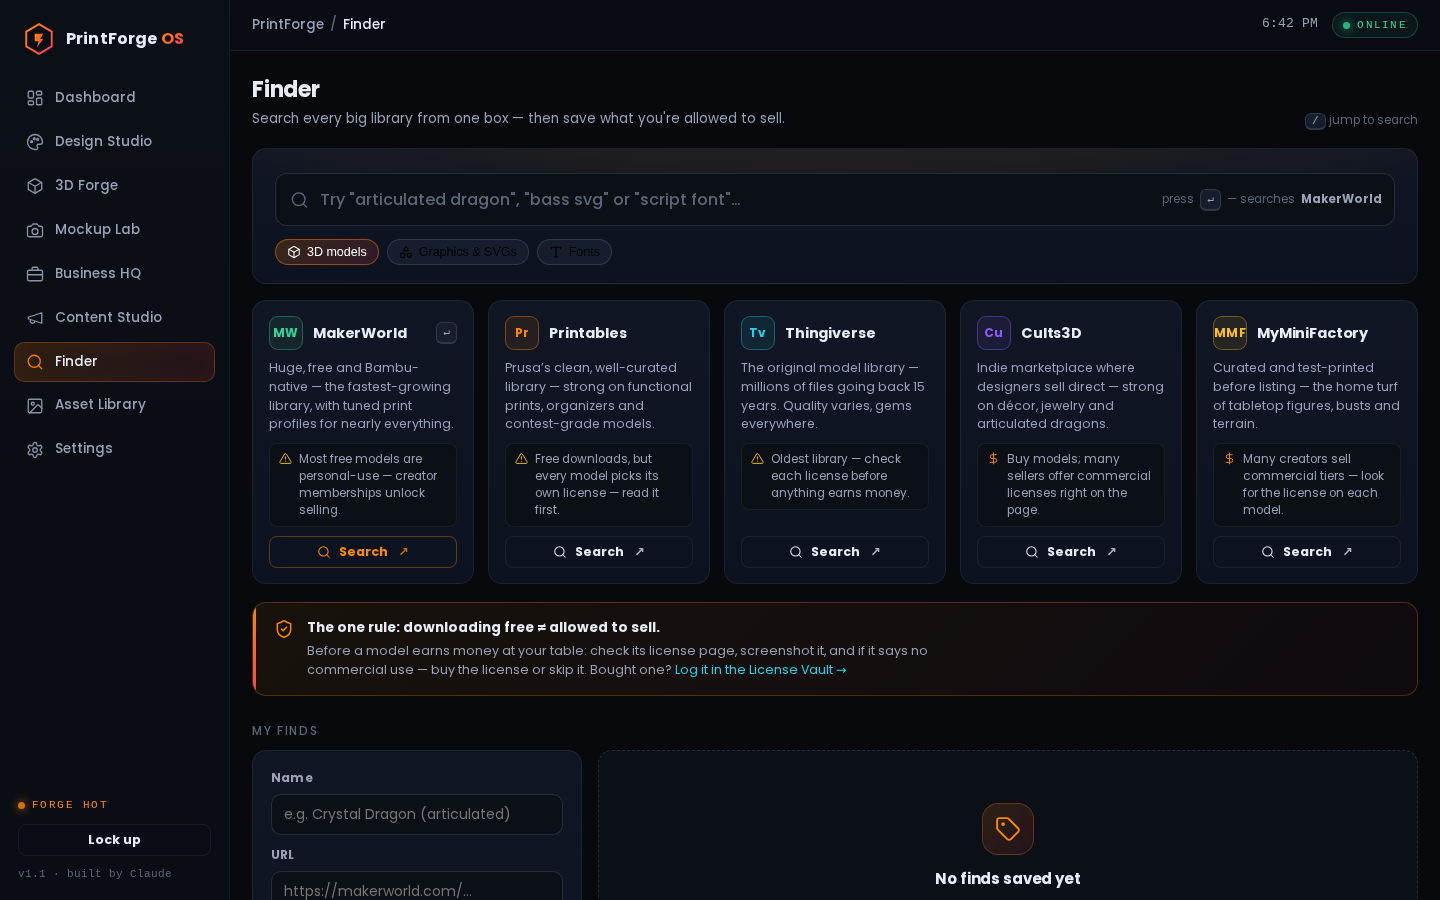
What this room is: one search box for the world's design libraries — millions of 3D models, graphics, and fonts other people made — plus a saved list that remembers whether each find is legal to sell.
Machine:3D PRINTER for models · XTOOL for graphics/fonts (via Design Studio).
What it earns you: an infinite catalog you didn't have to design — dragons, organizers, seasonal decor — sold legally.
Type once, search anywhere. Cards tell you each library's license reality before you click.
Using it
Type what you want ("articulated dragon," "fishing svg," "script font"). Pick the kind: 3D models / Graphics / Fonts.
Press Enter to open the best library for that kind in a new tab — or click Search on any card. Each card's one-liner tells you the license truth of that site before you go (MakerWorld: free usually = personal-use; Creative Fabrica: your sub covers selling; Openclipart: public domain; etc.).
On their site: download the STL (for 3D) or SVG/PNG (for graphics → drag into Design Studio or Asset Library). Read the model's license line.
Back in Finder, save the find: name, link, and the honest license answer — Commercial OK / Personal only / License purchased / Unsure. "Personal only" wears a red badge: fine to print for your house, never for your table.
Bought a commercial license? Log it in the License Vault (the orange strip links you straight there).
The one rule, built in: downloading free ≠ allowed to sell. The Finder exists so future-you, standing at a market, knows every item's answer without guessing.
The Designer Directory new in v1.2
Below the search box now lives a hand-picked shelf of the exact designers whose models sell at markets — no searching required. Filter it with the chips: Clickers & Fidgets · Playsets & Animals · Flexi & Dragons · Free / Public domain. Every card tells you three things in plain English: what they make, how the money works ("free to download; the commercial license comes through their Patreon"), and a color — green means sell freely, yellow means free download but check each model's license, orange means money buys the rights. Click through to their page, or use the card's save button to drop the designer straight into My Finds, ready to review.
Some of what's already on the shelf: AstroDex (122 free food clickers — the macaron, sushi and chocolate-bar ones), Toby3D (Cute Mini Dinosaurs and the Mini Animals series — free to print, with lifetime commercial licenses sold once on Cults3D, no subscription), GlennovitS 3D (the "Minimals" safari and savanna packs), Cinderwing3D (the print-in-place flexi dragons every kid stops for — about $10/mo with the commercial license included while you're subscribed), Flexi Factory (the original flexi animals), and the Smithsonian's Open Access scans — 2,000+ museum pieces, CC0, the safest sell-freely shelf in the entire directory.
The license decoder — legalese into English
Model pages describe their rules in license-speak. This table (it lives right in the room, under the directory) is the translation:
The page says
The answer
CC0
Sell it. No credit needed, no strings.
CC-BY
Sell it — credit the designer on the listing or the tag.
CC-BY-SA
Sell it — credit the designer; any remix you share must use the same license.
CC-BY-ND
Sell it — credit the designer, and print it unmodified.
Anything with NC
Personal use only. Never sell it — not even "just this once." NC means non-commercial.
No license shown
Assume personal-only until the designer says otherwise. Ask, or skip it.
Commercial membership
Sell while you're subscribed. The rights end the day you cancel.
Purchased license
Sell it forever — and keep the receipt where you can find it.
Two deals that look great and aren't
The directory also flags the traps, because the worst money you can spend is a subscription that doesn't do the one thing you bought it for:
The Thangs Bundle ($14.99/mo — "15,000 models!"): fifteen thousand models for fifteen dollars looks unbeatable, but the bundle does not include commercial rights — their own FAQ says so. Every one of those models is house-prints-only. 3DCentral "Supporter" ($19.99/mo): same story — the tier is personal use only, so you'd pay twenty dollars a month for models you still can't legally sell.
The full loop, start to finish: find it here → download it → drop the zip in the Model Vault (Chapter 7) → set its badge → if you decide to sell it, buy the license and log it in Business HQ's License Vault (Chapter 9). Every room hands off to the next.
The fine print — small things that eventually matter
Library cards glow orange as you type, and the Enter key's target changes with your words. As you type, some library cards light up orange — that's the Finder telling you those sites are especially good at what you just typed (try "organizer" and watch Printables glow; "dragon" lights up MakerWorld). The card wearing the little ↵ mark is the one the Enter key will open, and the note beside the search box names it, so you always know where Enter is about to take you. With nothing typed, Enter simply opens that library's front page for browsing.
The directory card's "Save to My Finds" button doesn't actually save — it only pre-fills the form. The "Save to My Finds" button on a designer card doesn't save anything yet — it fills in the form below (which flashes orange to show you where) and pops up a note asking you to set the license first. Nothing lands on your list until you press "Save find". That extra step is on purpose: it makes you look at the license answer before a designer joins the list you'll trust on market day.
What the Save form insists on, and the red messages you'll see. The Save form insists on two things: a name, and the complete web link. If your link doesn't begin with http:// or https://, a red message appears — "Paste the full link — it must start with http:// or https://". The easy fix is to copy the address straight from the top of your browser instead of typing it. The full link matters because months from now, standing at a market, you'll click it to re-check a license.
Pasting a link auto-detects the site: a blue Source badge appears and the Kind menu switches itself. The moment you paste a link, Finder recognizes the big sites: a small blue badge pops up next to "URL" naming the site (MakerWorld, Printables, Etsy…), and the Kind menu switches by itself — paste a Google Fonts link and Kind flips to Fonts. That name becomes the Source column in your saved list, so you can see at a glance where every find came from. If no badge appears, the site just isn't one it knows — your find still saves fine.
Removing a find (the trash button and its warning) — and the fact that there's no edit button. Every row in My Finds ends with a small trash-can button. Click it and Finder double-checks with you — and reminds you that if you bought that model's license, the receipt should stay safe in the License Vault. One thing to know: there's no edit button. If a find's answer changes — say you finally bought the commercial tier — remove the old row and save it again with the new license. Thirty seconds, and your list stays honest.
The "cleared to sell" tally above the My Finds list. Above your list sits a little tally like "7 saved · 3 cleared to sell." The green number counts only the finds marked Commercial OK or License purchased — in other words, your true market-day count. If it's smaller than you expected, some finds are still parked on "Unsure" or "Personal only," and that's the Finder gently telling you there's homework left before those can earn money.
The Notes box, and the License menu always starting on "Unsure". The Notes box is for the detail future-you will want, like "$12 commercial tier on the creator's page" — it shows up in your list so the answer travels with the find. And notice the License menu always starts on "Unsure": that's deliberate. Nothing gets marked sellable unless you chose it, and after each save the form wipes itself back to "Unsure," ready for the next find.
The "Couldn't load your finds" error card. If the My Finds area ever says "Couldn't load your finds — the server didn't answer," don't worry: your list isn't gone. The app just couldn't reach its own server for a moment. Press Retry, and if it keeps happening, walk through the "Site unreachable" fix in Chapter 16 — the finds will all be there when the connection comes back.
12Asset Library
What this room is: the image drawer — 16 bundled backgrounds & art pieces, everything you upload, every AI render and saved mockup, all in one searchable place.
Machine:NONE — it feeds the Design Studio and your social posts.
Filter by Pack / Uploads / AI, search by name, click for full-size with copy/download.
Drag any image in (PNG/JPG/WEBP/SVG, 25MB max — iPhone HEIC photos: export as JPG first). Click any card for the big view with Copy URL / Download — plus Delete on your own uploads and AI art (the 16 bundled pack images are read-only). Your five Content-Forge brand images belong here — drag them in from BRAND-ASSETS.md's links before they expire (~Aug 9).
The fine print — small things that eventually matter
"Send to 3D Forge" cube button and its four-choice menu. Every picture in this drawer is one click away from becoming a real, printable thing. Rest your mouse on any image and a little cube button appears — that's Send to 3D Forge. Click it, pick what the picture should become (a Lithophane that glows when backlit, a Keychain, a Relief plaque, or a Filament Painting), and PrintForge carries the image straight into the 3D Forge for you — no downloading and re-uploading. When a customer hands you a photo at the booth, this cube is the shortcut from "nice picture" to "thing I can sell."
"Use in Design Studio" button in the big preview. Under the big preview is a button called Use in Design Studio — it's how a background or customer photo actually gets onto a tumbler design. Click it, then over in Design Studio add an Image layer and paste; the picture lands on your canvas. The button even pops up a little message reminding you of those exact steps, so you never have to memorize them.
The delete warning — and what deleting really breaks. Before deleting, the app warns you: "Anything using this file will show a broken image." Take that seriously — if a saved design or mockup was built with that picture, the picture vanishes from it too, and there's no undo. Images sitting in the vault cost you nothing, so when in doubt, leave them be.
Flipping through images in the big preview (arrows, ← → keys, counter, pixel size). The big preview doubles as a slideshow: click the arrows on either side of the picture — or just tap the ← and → keys — to flip through every image in your current view, with a little "3 / 16" telling you where you are. It's the fastest way to browse the whole pack when you're hunting for the right background. The numbers like 1024×1024 are the picture's size in pixels — bigger numbers mean sharper prints.
Hover shortcut buttons on every image card. You don't have to open the big view for everyday jobs. Rest your mouse on any image and three tiny buttons appear in its corner — the cube (Send to 3D Forge), Copy URL, and Download. One click and it's done, which is handy when you're grabbing several images in a row for a post.
The library jumps to the Uploads view right after an upload. The moment an upload finishes, the library switches itself to the Uploads view so you can see your new arrivals — don't panic if the bundled backgrounds seem to disappear. Nothing is gone: click the All chip at the top and everything comes back. And yes, you can drag in a whole batch at once; the box counts them off as they land.
The "vault is empty" screens that mention a server command. If you ever open this room and see "The vault is empty" or "No bundled pack found," your 16 built-in backgrounds were simply never generated on the server — your own uploads and AI art are fine. The command it mentions (node scripts/make-pack.mjs) isn't something you click here; it gets typed once in the same terminal used to install the app, so run it there or ask whoever set up your droplet. And if you see "The vault didn't answer," just press Try again — it usually means the server blinked for a second.
13Settings
What this room is: four cards of numbers and keys the whole app reads from. Five minutes here makes every other room smarter.
Shop numbers, the AI connection, password, and storage info.
Shop settings — set these once
Field
Where it's used
Gear investment
The payback bar's finish line. Your real all-in spend.
Labor rate $/hr
Pricing Lab's your-time number ($25 default — don't lower it).
Your reminder of what portion of profit isn't yours (25% is safe).
Default markup ×
Pricing Lab's starting multiplier (3.5× serves you well).
Content goal /week
The calendar's goal bar (3 to start).
AI connection — the 5-minute hookup that wakes up Magic Draft
At platform.openai.com (the pay-per-use side of ChatGPT's company): sign up → Billing → add $5 credit (≈100+ images, no subscription).
API keys → Create new secret key → copy the sk-… code immediately (shown once).
PrintForge → Settings → AI connection → paste → Test → green badge. Done: Magic Draft, "AI art," and "Polish with AI" all wake up. Leave Base URL and the model names alone.
Your key lives only in your droplet's database (you'll only ever see its last 4 characters again) and is sent nowhere except OpenAI. Disconnect erases it. Costs land around 2–7¢ per generated image.
Security & About
Update password (on the Security card) = the only key to the whole shop; make it strong. About shows version and disk usage.
The fine print — small things that eventually matter
Nothing autosaves — each card has its own save button plus a yellow 'Unsaved changes' dot. Nothing on this page saves itself. Each card has its own button — Save shop settings, Save AI settings — and a little yellow dot glows in the corner whenever you've typed something that isn't saved yet. If you change a number and wander to another room without clicking Save, the change quietly vanishes, so treat the yellow dot as the shop light left on: click Save before you go.
Cmd+S / Ctrl+S saves in Settings too (the footer even shows a '⌘S saves' hint). The same Cmd+S (Ctrl+S on a PC) you use to save designs works right here in Settings — it saves whichever card you're typing in. Handy when you've just tuned a number and your hands are already on the keyboard.
The 'Shop name' field — first box on the Shop card, absent from the manual's field table. The very first box on the Shop card is Shop name, and it matters more than it looks: whatever you type here is stamped on your dashboard, your mockups, and every file you export — so customers see it. Put your real business name in once; if you ever clear it out, it quietly goes back to 'PrintForge OS'.
Money fields refuse anything that isn't a plain number — with a toast error. The money boxes want bare numbers — the dollar signs, percent signs and 'x' are already printed beside them for you. Type '$25' or '3.5x' and the save stops with a message like '"Labor rate" needs to be a number'. Nothing is lost; just strip the symbol and save again.
What 'Test connection' actually does: it saves your typing first, then shows detailed result badges. Test connection does a little favor first: it saves whatever you've typed, then knocks on the provider's door. A green badge like 'Connected — 84 models visible' means you're in business; a red badge spells out what went wrong, and 'No key saved yet — paste one above first' just means the key box is still empty. The card's top corner keeps score too — 'Not connected' before, 'Key ends in 1234' after.
Replacing a saved API key (without disconnecting). The day your OpenAI credit runs dry and you make a fresh key, you don't need to disconnect anything — just type the new key straight over the dots in the API key box and hit Save AI settings. Leaving the box blank always keeps the key you already have.
Password rules and their error messages (6-character minimum, typed twice, current one required). Changing the password takes three boxes: your current one, the new one (at least 6 characters), and the new one again. The app tells you plainly if something's off — 'New password needs 6+ characters', 'The two new passwords don't match', or 'Current password is wrong'. If the current one is lost entirely, that's what Chapter 16's reset recipe is for.
The 'Sessions stay signed in for 30 days per browser' note — and what it means when you change the password. A small note on the Security card explains why the app almost never asks you to log in: each browser stays signed in for 30 days. One thing worth knowing — changing the password doesn't boot out phones or laptops that are already signed in; they ride out their 30 days. So if you're locking someone out for real, count on that lag.
The About card's storage breakdown (four categories with file counts) and the 'Open Asset Library' button. The About card's colored bar shows exactly what's eating your disk: the Database (your orders and designs), the Asset pack that shipped with the app, your Uploads, and AI art — each with a file count and size. Your droplet only has 1GB, and AI art is the pile that grows on its own, so when the bar creeps up, the Open Asset Library button at the bottom takes you straight to where old uploads and AI images can be tidied away (the built-in pack can't be deleted, and doesn't need to be).
PART 3
Do
Hands on the keyboard. What the machine software actually is, six complete jobs from first click to money in the jar, and how to keep the whole system healthy for years.
14From screen to printed thing
The bridge chapter. You've exported a file — here's what the machine software is, and the exact clicks on each side.
Meet the two programs (once)
xTool Studio came with your O1 Omni — it's the machine's cockpit: it sees the printer, knows the materials, and controls the actual printing. Bambu Studio is the Bambu printer's free "slicer" — remember the dictionary: it cuts a 3D model into layers and writes the robot's instructions. You install both on your computer once, from each company's site. PrintForge hands them perfect files; they do the last mile.
Flat stuff: PNG → xTool Studio → printed blank
Design Studio → Export → PNG 300 DPI (or transparent PNG for acrylic/stickers). It lands in Downloads.
Open xTool Studio → new project for your blank type (flat bed, rotary for tumblers, fabric for DTF).
Import the PNG. Set size to 100% / original — it's already exactly right; resizing by eye is how prints go wrong.
Position on the bed preview, pick the material preset, print. The machine handles inks and curing.
Drinkware rule from your playbook: print the outside only, stay below the lip line, hand-wash card in the bag.
3D stuff: STL → Bambu Studio → printed object
3D Forge (or a Finder download) → you have an STL file.
Open Bambu Studio → drag the STL onto the build plate. It arrives at true size — the millimeters PrintForge's footer showed.
Product-specific setup:
Night light / lithophane: rotate it to STAND UP vertically, 100% infill (or 4+ walls), white PLA, 0.12mm layers.
Keychain: lays flat, defaults are fine. Two-color base plate? Find the swap layer (PrintForge told you), right-click that layer in Bambu Studio's preview slider → Add filament change.
Plaque: flat on its back, 15% infill, 3 walls.
Filament painting: flat, face up, then add a filament change at every layer on your Swap Plan card.
Slice (the big button — it shows time + grams) → Print. Film the timelapse; that's content.
Not a Bambu? STL is universal. Your friend drops the same file into PrusaSlicer/Cura/whatever their printer uses — same steps, different button names.
15Six recipes, start to finish
Complete jobs with every room in order. Do each once and you own this app.
Recipe 1 — Custom name tumbler (the bread & butter)
Order comes in: "Can you do one that says Vanessa?" → Business HQ → Orders → + Order (customer, "Custom 20oz Tumbler," due date). Design: Design Studio → Layouts → search "name" or pick a tumbler layout → double-click, type VANESSA → tweak colors → ⌘S. Preview to close the sale: Mockup Lab → pick the design → tumbler scene → export 1080² → text it to her. Print: Export PNG 300 DPI → xTool Studio → rotary → print. Get paid: move the order card to delivered → Mark paid → watch the Dashboard tick up. Total screen time: under 10 minutes.
Recipe 2 — Pet night light from a customer photo
Order in Business HQ ($32, "Lithophane Night Light"). 3D Forge → Lithophane → drag in their dog photo → Night-light 60 arch preset → Backlight to check the glow (dark photos: nudge Max thickness up) → Export STL → Bambu Studio → stand vertical, 100% infill, white PLA → print (~2–3 hrs) → snap it glowing on the LED base → that photo is BOTH the customer delivery AND tonight's Before→After post (Content Studio has the hook ready).
Recipe 3 — Twenty keychains for Saturday's market
3D Forge → Keychain → Text mode. Type the market list — top-10 local kid names, plus BOWLING, LAKE LIFE, your town name — exporting each STL (30 seconds apiece). Bambu Studio: drag several onto one plate, print plates back to back overnight. Inventory tab: −20 keychain... actually keychains are pure filament — just check your spool count. Price at $8–10 on the table; watch which names sell; Content Studio → "What sold/flopped" recap after.
Recipe 4 — League shirts pitch (B2B, the fast lane)
Design Studio → Layouts → Shirts → "Team name + number" → swap in HARBOR LANES colors → save. Mockup Lab → T-shirt scene → navy shirt → export 2048². Email/text the mockup to the league manager with a per-shirt price from the Pricing Lab (24+ units = club pricing). On yes: Business HQ order with 24 line items, and the payback bar takes its biggest single jump yet.
Recipe 5 — Filament painting for the booth wall
Pick a striking local photo (sunset over the lake — your SUP shots are perfect). 3D Forge → Filament Painting → Sunset palette → 4 bands → download the Swap Plan → Bambu Studio → add the filament changes → print face-up. Hang three of these behind your table and watch people stop walking. Price $25–45; film the color swaps for a "how it's made" post.
Recipe 6 — Full market day, the loop
Week before: Events tab (booked, fee logged) → inventory check (low-stock warnings answered) → print stock evenings. Night before: Content Studio → Market Day → Pack list, check everything into the car. Day of: follow the setup timeline; capture the 5 clips; take custom orders on paper or straight into Orders on your phone. Drive home: Log results on the event (revenue, costs) → payback bar moves. That evening: recap post from the captured clips; restock inventory numbers; schedule this week's content. Repeat until the thermometer's full.
16Care & feeding
Owner-level upkeep. Commands run on the droplet: Mac Terminal → ssh root@167.99.98.218 → cd /opt/printforge/printforge.
Installing updates (like v1.4)
When Claude hands you a new zip: download it, then open a fresh Terminal window (⌘N) and paste the whole line:
The mistake everyone makes once (or twice): running scp while you're still logged into the droplet. scp copies from your Mac, so it must run in a window that's still on your Mac. Read the prompt before you paste: glennfraser@… = your Mac (good), root@printforge = the droplet (type exit first, or open a new window).
Your data is never touched by updates — orders, designs, settings, uploads and your Vault models live in Docker volumes that survive rebuilds. Refresh the browser afterward (the sidebar's version number confirms it took).
Backups (monthly, or before anything scary)
Easiest: DigitalOcean dashboard → your droplet → Snapshots → Take snapshot (~$1/mo). Manual alternative:
docker compose exec printforge node --disable-warning=ExperimentalWarning -e "const {DatabaseSync}=require('node:sqlite');const d=new DatabaseSync('data/printforge.db');d.prepare('DELETE FROM settings WHERE key=?').run('password_hash');console.log('cleared')" && APP_PASSWORD=MyNewPassword123 docker compose up -d --force-recreate
Quick fixes
Symptom
Fix
Site unreachable
docker compose ps → up -d if down; then logs; then paste the error to Claude.
"Connect AI in Settings" hints
Chapter 13's 5-minute hookup — everything else works without it.
Mockup Lab shows no designs
You exported without saving. Save in Design Studio; refresh the picker.
Choppy 3D preview
Raise the Resolution number (fewer triangles, same print). Close other tabs.
Magic Draft error mid-generate
The message shows in the modal; your prompt is preserved — usually just retry.
Upload won't appear
25MB max, PNG/JPG/WEBP/SVG only (iPhone HEIC → export as JPG).
The fine print — messages and limits worth knowing
The little popup notes (toasts) — especially "Network error — is the server up?". The app talks back in small popup notes that appear for about three seconds and fade by themselves — a green check means "done, saved," a red triangle means "that didn't work," and you never need to click them away. The one red note to memorize: "Network error — is the server up?" It means your browser couldn't reach your droplet — usually your wifi hiccuping, sometimes the forge itself napping. Check your internet first; if that's fine, Chapter 16's five commands wake the droplet up.
The "[Room name] hit a snag" error screen. Once in a blue moon a room refuses to open and shows "…hit a snag" with a technical-looking sentence under it. Don't panic — your orders and designs are safe on the droplet. Refresh the browser first; nine times out of ten the room comes right back. If it keeps snagging, run the restart command from Chapter 16 — and if even that doesn't clear it, copy that sentence and paste it to Claude, because it's exactly the clue needed to fix things.
The importer's two quiet limits: 400 models per zip, 120MB per loose file. Two limits the drop zone won't announce: a single zip imports at most 400 models — anything past number 400 is quietly left behind — and one loose file tops out at 120MB (you'll see "File too large (120MB max)"). Zips up to 1GB are fine, as Chapter 7 says. So if you ever buy one of those monster "500 models!" bundles, count the cards after importing and split the zip in two if the numbers don't match — otherwise you'd be missing models you paid for and never know it.
17The cheat sheet
Which room?
Flat art on things → Design StudioXTOOL
Photo into object → 3D Forge3D
Someone else's model → Finder3D
Downloaded model — may I sell it? → Model Vault3D
Product photo, no printing → Mockup Lab
Price / order / stock / license / market → Business HQ
What to post → Content Studio
Design Studio
⌘/Ctrl+S save · ⌘Z/⌘Y undo/redo · ⌘D duplicate
⌘0 fit · wheel zooms to cursor · Space-drag pans
Arrows nudge (Shift = big) · ⌘[/⌘] layer order
Double-click text edits · Shift-drag corner = free resize (shapes & images — text always keeps its proportions)
Layouts = start from finished · ✨ Magic Draft = describe it
3D Forge
1–6 tools (5 = AI Sculptor, 6 = Flexi Forge) · E export STL · S save · B tab special (backlight / 2D bands) · V views
Flexi joints fused? Raise Joint gap 0.05 and reprint — tune once, dialed forever
Model Vault
Drop .zip packs whole — no unzipping, up to 1GB
Everything imports as "Needs checking" · Cleared to sell card = market-day list
Red badge = house prints only, never the table
Mockup Lab
1–5 scenes · E export · S save scene · R reset camera
Business HQ
1–6 tabs · N new · delivered (or marked paid) = money counts
Content / Finder
G generate · N new idea · / focus Finder search · Enter opens top library
The daily loop
Dashboard: anything red?
Orders board: move cards, start prints
Film one clip from a shot list
Evening: advance content chips, log sales
The weekly loop
3 posts (the calendar keeps score)
Print stock for the weekend
Check inventory + license renewals
One new layout or Magic Draft experiment
PrintForge OS v1.4 · The Beginner's Guide · forged by Claude, August 2026 Design it → Forge it → Price it → Sell it